Custom Warehousing - Into Warehouse Declaration
What is an 'Into Warehouse Declaration'?
If you import goods from outside the UK and wish to delay paying duty, you can store the goods in a customs warehouse. To do this you must make an 'Into Warehouse Declaration'.
Later, you can release the goods to another customs procedure, or move goods to another customs warehouse. You will only pay duty once the goods are removed from the customs warehouse and released to free circulation. For more information click here.
Create an 'Into Warehouse Declaration'
There are three ways to declare goods into your customs warehouse in Sequoia:
1) Declare an import Simplified Declaration (SFD)
2) Declare an Import Full Standard Declaration (IFD)
3) Create an 'Offline Import Declaration' (an OLI - Offline Entry) to capture the declaration details submitted by a 3rd party, such as an agent
After you create and submit an Import Full Standard Declaration (IFD) or an import Simplified Declaration (SFD) with the appropriate warehouse information and procedure codes entered into them, Sequoia will automatically create a Customs Warehouse Stock Record once the declaration has been accepted by customs.
If a 3rd party is moving the goods into your warehouse and has made the declaration, you will need to enter the details of that declaration into Sequoia. Create an 'Offline Import Declaration' (an OLI - Offline Entry) and enter the details of that declaration, including your warehouse details. Click on Save and the Customs Warehouse Stock Record will be created.
Step 1: Create a Job
First, create a Job. A Job can contain all the records and documentation related to a consignment of goods. From within your Job you can create your declaration and subsequently the Customs Warehouse Stock Record.
For a comprehensive guide on how to complete an Ocean Import Job click here, an Air Import Job click here and a Road Import Job click here.
Step 2: Add an Import Declaration to the Job
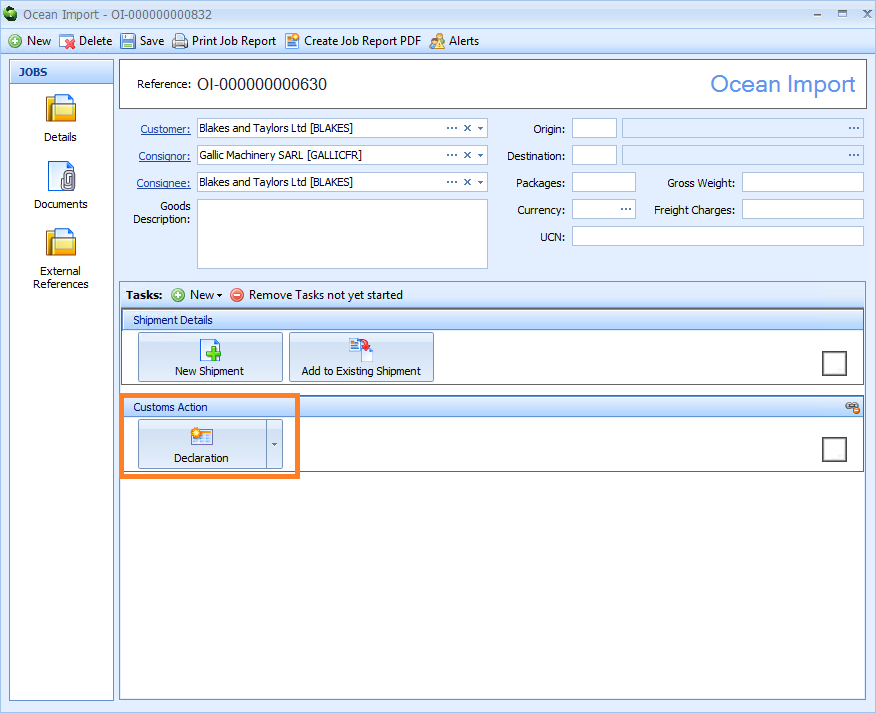
Once you have created your Job, add a customs declaration to it by clicking on the Declaration button in the Customs Action Tasks section of the Ocean, Air or Road Import editor.
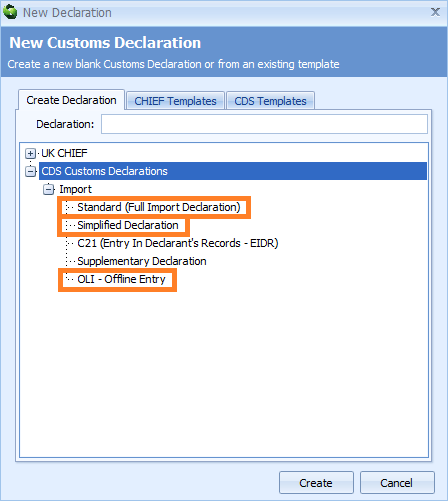
A New Customs Declaration dialog box will appear displaying a list of templates of different types of declarations.
Under the CDS Customs Declarations section, select either Standard (Full Import Declaration), Simplified Declaration or OLI - Offline Entry by either double clicking on them or by clicking on them once and then clicking on the Create button.
Add A Simplified Declaration or a Full Standard Declaration
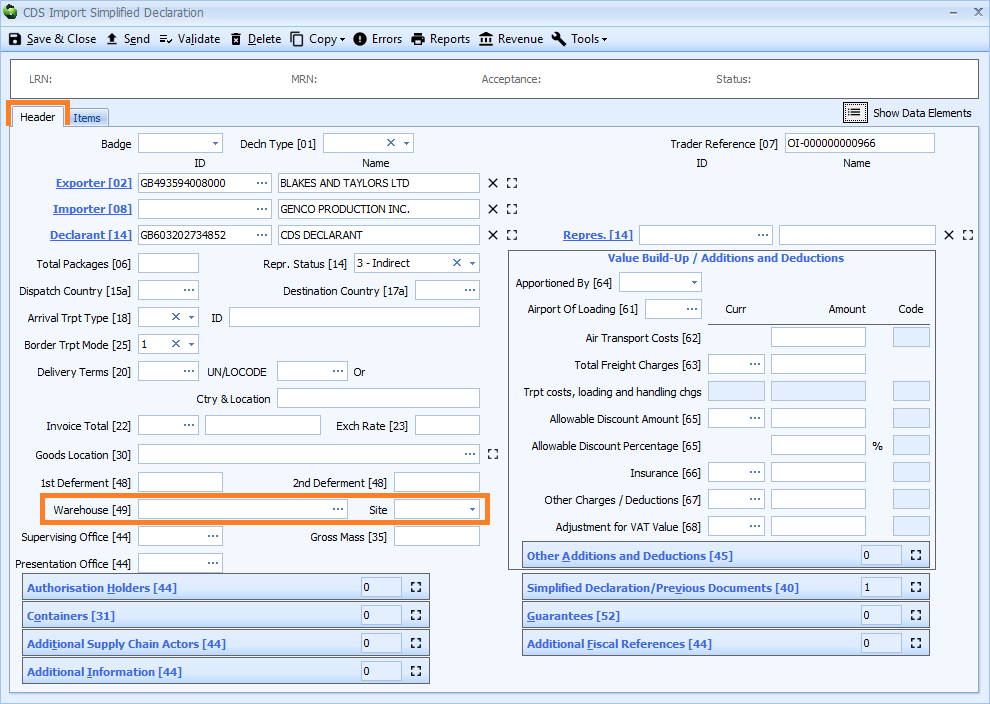
If you have selected a Simplified Declaration, a CDS Import Simplified Declaration editor will appear. If you have selected a Standard (Full Import Declaration), a CDS Import Full Declaration editor will appear. The Header tab on these editors will automatically show. Some of the information from the Job will be automatically entered into some of the boxes. For a comprehensive guide on how to complete a CDS Import Simplified Declaration, click here.
In these editors, enter the warehouse information into the Warehouse [49] box and Site box. This information will be automatically entered if you have configured it in CRM. If not, you can type this information into the boxes or select it from a list by either typing a ? into the Warehouse [49] box or by clicking on the ellipsis (the 3 dots) to the right of this box to display the Warehouse Premises Lookup Dialog box. Next, enter the warehouse premises information or part of the warehouse premises information into the search box, click on the binoculars icon to search for it and then select it from the resulting list by double clicking on it. The Site box will automatically update according to what is entered into the Warehouse [49] box.
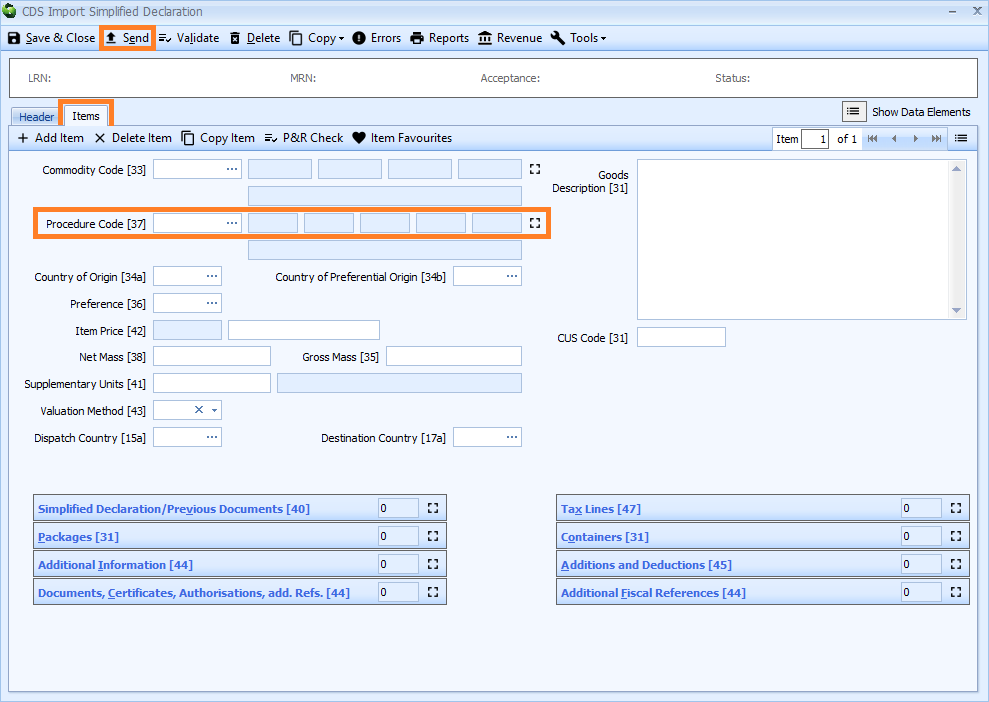
Next, click on the Items tab and enter your CPC code into the Procedure Code [37] box. This information will be automatically entered if you have configured it in CRM. If not, you can type this information into the boxes or select it from a list by either typing a ? into this box or by clicking on the ellipsis (the 3 dots) to the right of this box to display the Procedure Code Lookup Dialog box. Next, enter the code or part of the code into the search box, click on the binoculars icon to search for it and then select it from the resulting list by double clicking on it.
Click on Additional Information [44] and Documents, Certificates, Authorisations, add. Refs [44] to add any additional information or documents. This information will be automatically entered if you have configured it in CRM.
Next, click on the Send button to send the declaration to customs.
Once the declaration is accepted, a Customs Warehousing Task will be automatically created and added to the Job. The Customs Warehousing Task contains the Customs Warehouse Stock Record.
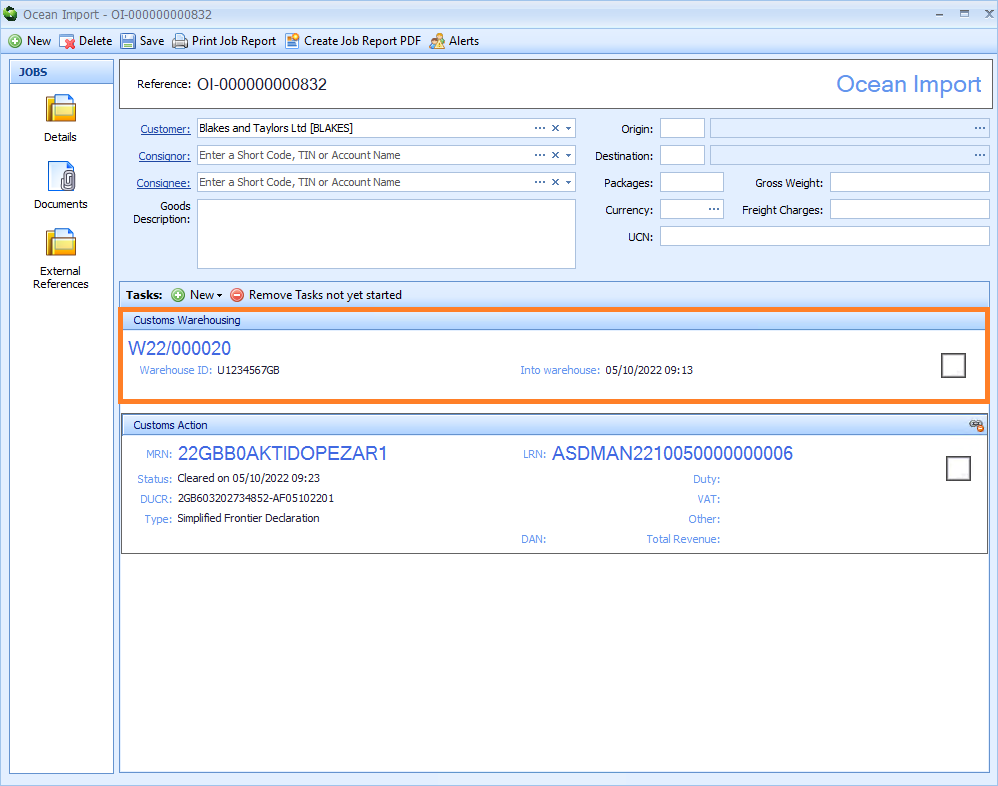
The Customs Warehouse Stock Record will not be set as completed. Removals cannot be processed until the stock items have been added to it.
Next, add the stock declaration details and stock items to the Customs Warehouse Stock Record (see Step 3: Enter the Header Information into the Stock Record below to learn how to do this).
Add a 3rd Party Declaration (OLI (Offline Entry))
If you have selected an OLI (Offline Entry), an Offline Import OLI Declaration editor will appear.
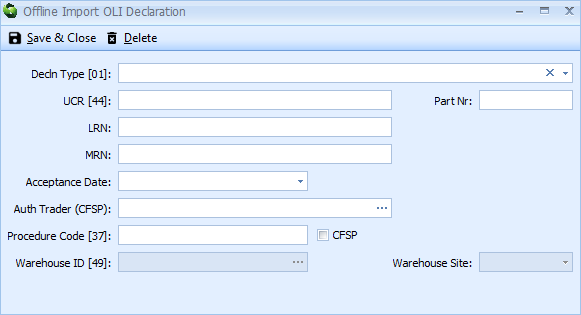
Next, enter the information described in the table below into the Offline Import OLI Declaration editor boxes and click on the Save & Close button.
| Box | Information |
|---|---|
| Decln Type [01] | Click on the arrow to the right of the box and select the declaration type from the drop down list |
| UCR [44] | The declaration UCR |
| Part Nr | The part number suffix to the declaration UCR, if applicable |
| LRN | The Local Reference Number on the declaration |
| MRN | The Movement Reference Number on the declaration |
| Acceptance Date | The date that the declaration was accepted/ arrived by customs |
| Auth Trader (for CFSP) | If CFSP is not being used, leave this box blank |
| Procedure Code [37] | Enter the CPC code declared |
| CFSP tick box | Tick this box if CFSP is being used |
| Warehouse ID [49] | Enter the warehouse ID manually if this box is not automatically filled |
| Warehouse Site | Enter the warehouse site ID manually if this box is not automatically filled |
On saving the declaration data, if the Procedure Code indicates that the goods are moving into a customs warehouse and the Warehouse ID and Site match your configured details, a stock record will be created and a corresponding Customs Warehousing Task will be added to the Job.
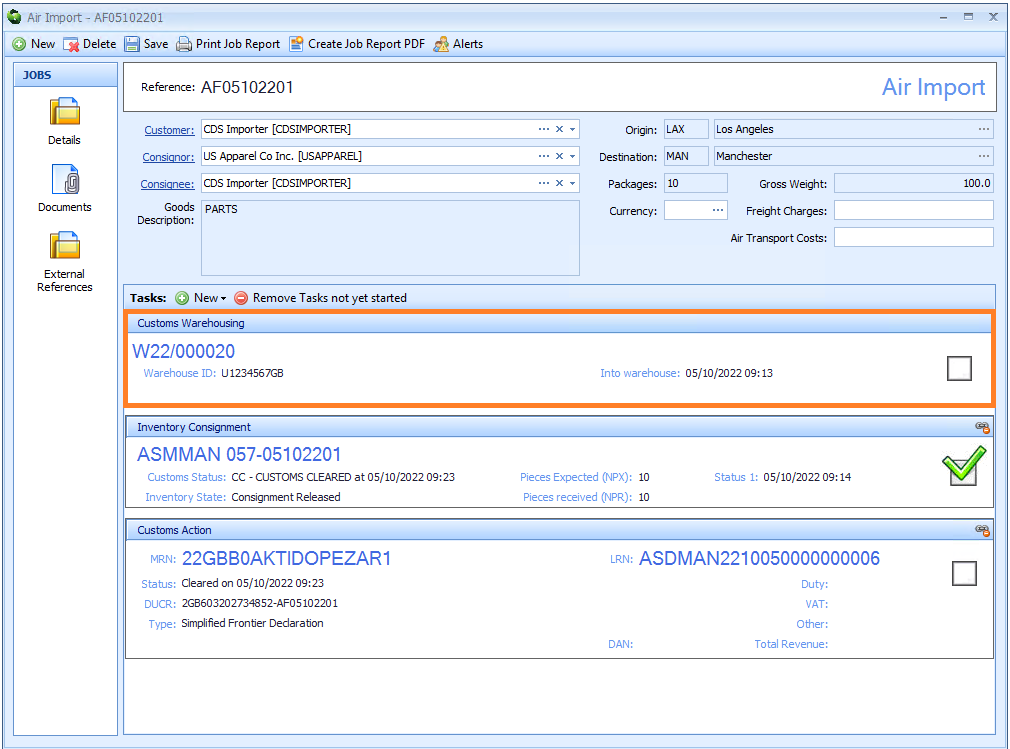
The Customs Warehouse Stock Record will not be set as completed. Removals cannot be processed until the stock items and declaration details have been added to it.
Next, add the stock declaration details and stock items to the Customs Warehouse Stock Record (see Step 3: Enter the Header Information into the Stock Record below to learn how to do this).
Step 3: Enter the Header Information into the Stock Record
Open the Customs Warehouse Stock Record in two ways:
1) Double click on the Customs Warehousing Task on the Job.

or
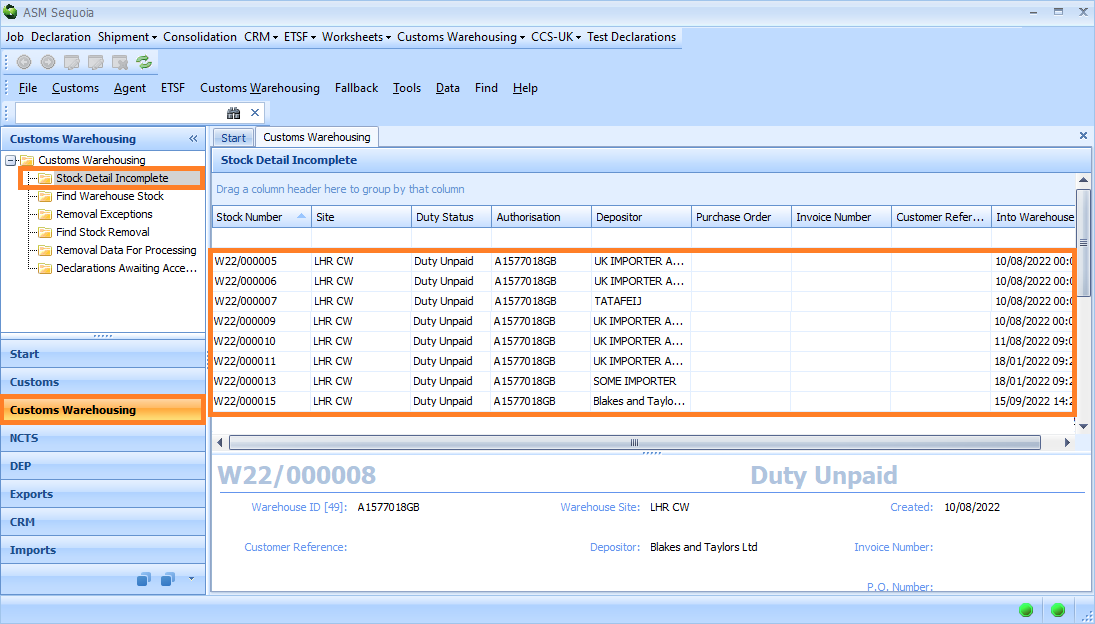
2) Click on the Customs Warehouse module on the left hand side of the page. Next, click on the Stock Details Incomplete folder at the top left hand side of the screen and then double click on the record in the List Panel.
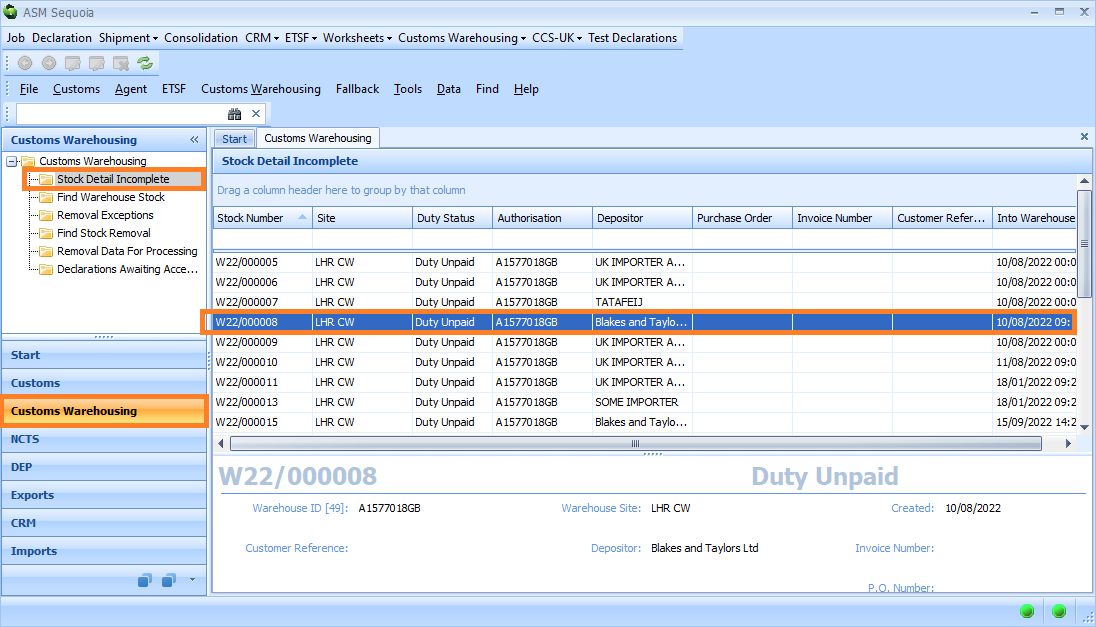
A Customs Warehouse Stock Record editor will appear displaying the stock record details. The area highlighted in orange is the Stock Header details section.
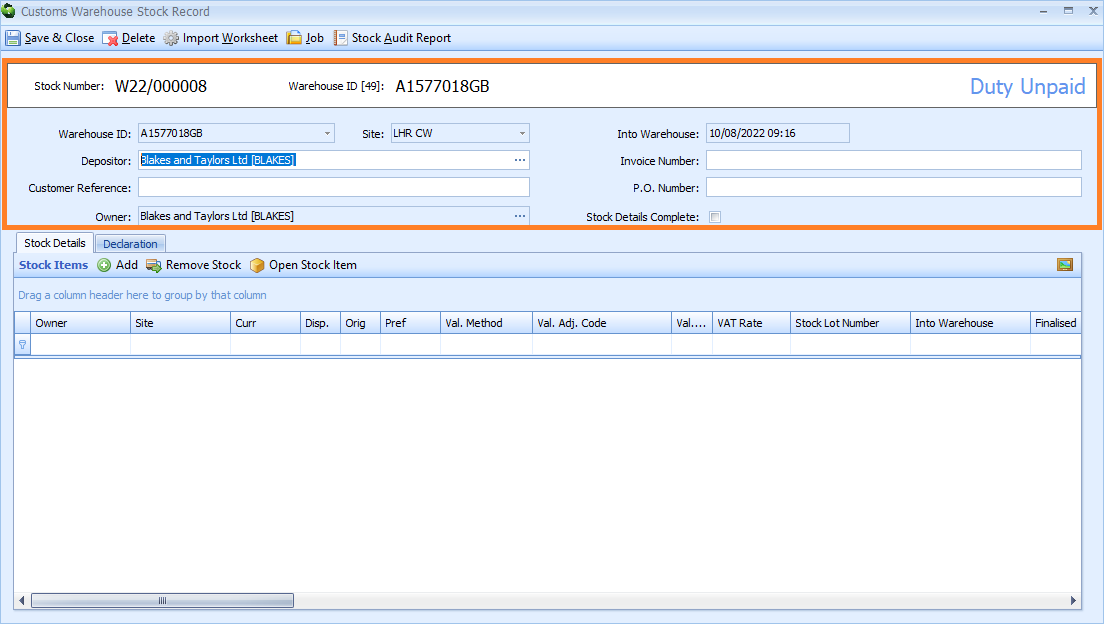
Next, enter the information described in the table below into the Stock Header section of the Customs Warehouse Stock Record editor boxes:
| Box | Information |
|---|---|
| Warehouse ID | The warehouse ID of the stock This box will automatically display what was added to the Warehouse [49] box on the declaration |
| Site | The warehouse site of the stock This will automatically display what was added to the Site box on the declaration |
| Depositor | The importer of the stock This box will automatically display what was added to the Importer box on the declaration. If this information needs to be changed, edit this box manually or select the information from a list by either typing a ? into this box or by clicking on the ellipsis (the 3 dots) to the right of this box to display the Account Lookup Dialog box. Next, enter the importer information or part of the importer information into the search box, click on the binoculars icon to search for it and then select it from the resulting list by double clicking on it |
| Customer Reference | Create your own unique reference for the customer which will help you identify the record in a list |
| Owner | The owner of the stock |
| Into Warehouse | This box will automatically display the date and time that the declaration was accepted by customs |
| Invoice Number | The invoice number of the stock |
| P.O. Number | The purchase order number of the stock |
| Stock Details Complete Tick Box | Tick this box AFTER you have finished adding all the stock items into the Customs Warehouse Stock Record editor (see instructions below) to show that the record is complete |
Step 4: Check and Complete the Declaration Information on the Stock Record
Next, click on the Declaration Tab on the Customs Warehouse Stock Record. This will display information that was added into the Import Full Standard Declaration (IFD), import Simplified Declaration (SFD) or OLI (Offline Entry).
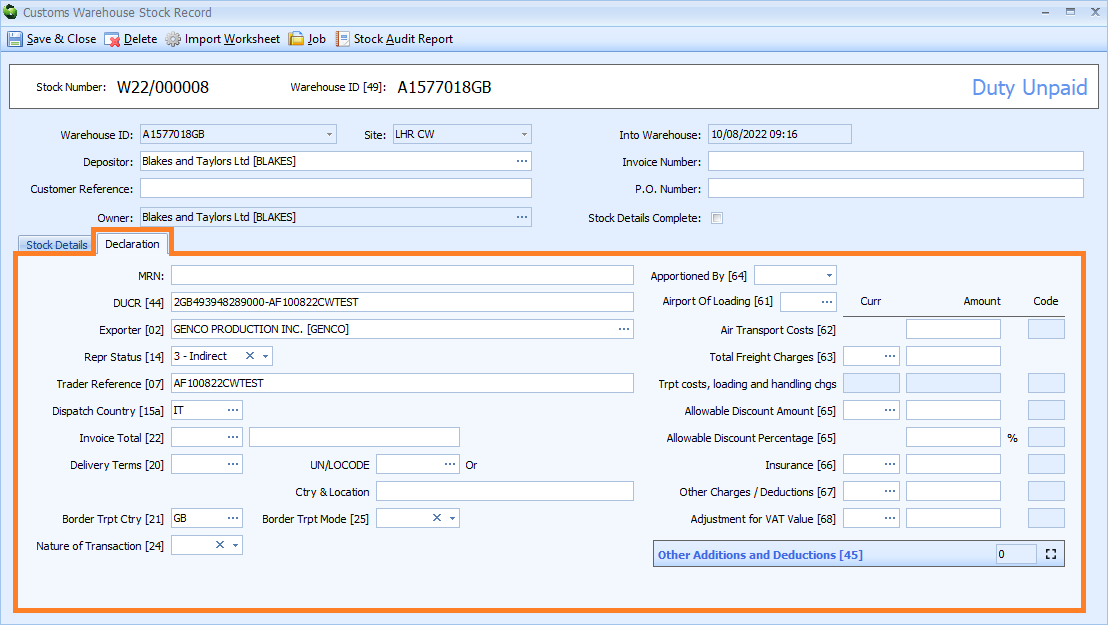
Enter any missing information described in the table below into the Declaration tab of the Customs Warehouse Stock Record editor boxes. This information will be automatically entered into any subsequent 'Out of Warehouse' declarations made.
| Box | Information |
|---|---|
| MRN | The Movement Reference Number on the declaration |
| DUCR [44] | The Declaration Unique Consignment Number on the declaration |
| Exporter [02] | The person exporting the goods You can type this information into the box or select it from a list by either typing a ? into this box or by clicking on the ellipsis (the 3 dots) to the right of this box to display the Account Lookup Dialog box. Next, enter the exporter information or part of the exporter information into the search box, click on the binoculars icon to search for it and then select it from the resulting list by double clicking on it |
| Repr Status [14] | Representative Status A person or organisation may appoint an agent to act as a representative on their behalf. 'Direct representation' is when the representative acts in the person's or organisation's name. 'Indirect representation' is when the representative acts in their own name but on behalf of the person or organisation. Select either '2 - Direct' or '3 - Indirect' from the drop down list |
| Trader Reference [07] | Enter your own unique reference for the trader |
| Dispatch Country [15a] | The country code that the goods were dispatched from You can select this information from a list by either typing a ? into this box or by clicking on the ellipsis (the 3 dots) to the right of this box to display the Country Lookup Dialog box. Next, enter the country code or part of the country code into the search box, click on the binoculars icon to search for it and then select it from the resulting list by double clicking on it |
| Invoice Total [22] | The invoice total of the goods The currency should be entered into the first box and the amount should be entered into the second box. Select the currency of the invoice by either typing a ? into the first box or by clicking on the ellipsis (the 3 dots) to the right of this box to display the Currency Lookup Dialog box. Next, enter the currency code or part of the currency code into the search box, click on the binoculars icon to search for it and then select it from the resulting list by double clicking on it |
| Delivery Terms [20] | Select the INCOTERM that describes the arrangments for the delivery of the goods You can select this information from a list by either typing a ? into this box or by clicking on the ellipsis (the 3 dots) to the right of this box to display the Delivery Terms Lookup Dialog box. Next, enter the INCOTERM or part of the INCOTERM into the search box, click on the binoculars icon to search for it and then select it from the resulting list by double clicking on it |
| UN/LOCODE or Ctry & Location | Enter the location UN/LOCODE or country and location information up to which the INCOTERM applies. If no UN/LOCODE exists for the location then type in a plain language description for the location in the Ctry & Location box. This should be entered as the country code followed by the place name - e.g. GBCanewdon. You can select the UN/LOCODE information from a list by either typing a ? into this box or by clicking on the ellipsis (the 3 dots) to the right of this box to display the Delivery Terms UNLocode Lookup Dialog box. Next, enter the UN/LOCODE or part of the UN/LOCODE into the search box, click on the binoculars icon to search for it and then select it from the resulting list by double clicking on it |
| Border Trpt Ctry [21] | Border Transport Country Enter the nationality of the active means of transport of the goods crossing the border, except in the case of a) ships or aircraft registered in the colonies or dependencies of a foreign country when you should enter the nationality of that country and b) ships or aircraft registered in the UK's dependent territories when you should enter the nationality of that territory. You can select this information from a list by either typing a ? into this box or by clicking on the ellipsis (the 3 dots) to the right of this box to display the Country Lookup Dialog box. Next, enter the country code or part of the country code into the search box, click on the binoculars icon to search for it and then select it from the resulting list by double clicking on it |
| Border Trpt Mode [25] | Select the mode of transport used to arrive the goods at the border by clicking on the small down arrow to the right of the box and selecting it from the drop down list that appears |
| Nature of Transaction [24] | Select the nature of the transation by clicking on the small down arrow to the right of the box and selecting it from the drop down list that appears |
| Apportioned By [64] | Choose to divide any freight charges in proportion to their value or gross mass. Click on the small down arrow to the right of the box and select either Value or Gross Mass from the drop down list |
| Airport of Loading [61] | The 3 character IATA airport code of the airport of loading or a special value as defined in the Tariff You can select this information from a list by either typing a ? into this box or by clicking on the ellipsis (the 3 dots) to the right of this box to display the Port Lookup Dialog box. Next, enter the port code or part of the port code into the search box, click on the binoculars icon to search for it and then select it from the resulting list by double clicking on it |
| Air Transport Costs [62] | The cost of air transport for the goods (in the currency defined in the Total Freight Charges [63] box below) should be entered into the Amount Box. The additions and deductions code (as described in the CDS Tariff and found on the declaration) will be automatically entered into the Code box |
| Total Freight Charges [63] | Enter the currency of the air transport costs and/or the air waybill/ freight charges in the Curr box. Enter the amount of the air transport costs and/or the air waybill/ freight charges in the Amount box You can select the currency information from a list by either typing a ? into this box or by clicking on the ellipsis (the 3 dots) to the right of this box to display the Currency Lookup Dialog box. Next, enter the currency code or part of the currency code into the search box, click on the binoculars icon to search for it and then select it from the resulting list by double clicking on it |
| Trpt costs, loading and handling chgs | Enter the transport costs, loading and handling charges amount in the Amount box and the currency in the Curr box. The additions and deductions code (as described in the CDS Tariff and found on the declaration) will be automatically entered into the Code box |
| Allowable Discount Amount [65] | Enter the discount amount for the goods in the Amount box and the currency in the Curr box. If no amount is declared then both boxes must be left blank. The additions and deductions code (as described in the CDS Tariff and found on the declaration) will be automatically entered into the Code box You can select the currency information from a list by either typing a ? into this box or by clicking on the ellipsis (the 3 dots) to the right of this box to display the Currency Lookup Dialog box. Next, enter the currency code or part of the currency code into the search box, click on the binoculars icon to search for it and then select it from the resulting list by double clicking on it |
| Allowable Discount Percentage [65] | The percentage discount for the goods to 2 decimal places. The maximum percentage that can be specified is defined in the Tariff. The additions and deductions code (as described in the CDS Tariff and found on the declaration) will be automatically entered into the Code box |
| Insurance [66] | The insurance amount for the consignment paid to cover the transport of the goods. Enter the amount in the Amount box, and the currency in the Curr box. If no amount is declared then both boxes must be left blank. The additions and deductions code (as described in the CDS Tariff and found on the declaration) will be automatically entered into the Code box You can select the currency information from a list by either typing a ? into Curr box or by clicking on the ellipsis (the 3 dots) to the right of this box to display the Currency Lookup Dialog box. Next, enter the currency code or part of the currency code into the search box, click on the binoculars icon to search for it and then select it from the resulting list by double clicking on it |
| Other Charges/ Deductions [67] | The other charges/deductions for the goods to be taken into account in calculating the customs value. Enter the amount in the Amount box, and the currency in the Curr box. If no amount is declared then both boxes must be left blank. The additions and deductions code (as described in the CDS Tariff and found on the declaration) will be automatically entered into the Code box You can select the currency from a list by either typing a ? into the Curr box or by clicking on the ellipsis (the 3 dots) to the right of this box to display the Currency Lookup Dialog box. Next, enter the currency code or part of the currency code into the search box, click on the binoculars icon to search for it and then select it from the resulting list by double clicking on it |
| Adjustment for VAT Value [68] | The VAT value adjustment amount for the goods specifies the additional costs that are included in VAT calculations. Enter the amount in the Amount box, and the currency in the Curr box. If no amount is declared both then boxes must be left blank. The additions and deductions code (as described in the CDS Tariff and found on the declaration) will be automatically entered into the Code box You can select the currency from a list by either typing a ? into the Curr box or by clicking on the ellipsis (the 3 dots) to the right of this box to display the Currency Lookup Dialog box. Next, enter the currency code or part of the currency code into the search box, click on the binoculars icon to search for it and then select it from the resulting list by double clicking on it |
| Other Additions and Deductions [45] | Additions and deductions are amounts that need to be added to or deducted from the item price to calculate the customs value of the goods. Click on the expand button to the right of this box. Then click on the + button to add a row and type in the CDS code, currency and amount |
Step 5: Add the Stock Items into the Stock Record
Next, enter the stock item details into the Customs Warehouse Stock Record editor either automatically (by importing them from a worksheet) or manually. Please note that if you have many items it is much easier and quicker to import them from a worksheet rather than to enter them manually.
Add Stock Items Automatically
If you have previously added a worksheet containing stock items into Sequoia (for instructions on how to do this click here, you can automatically enter these stock items into the Customs Warehouse Stock Record by importing that worksheet.
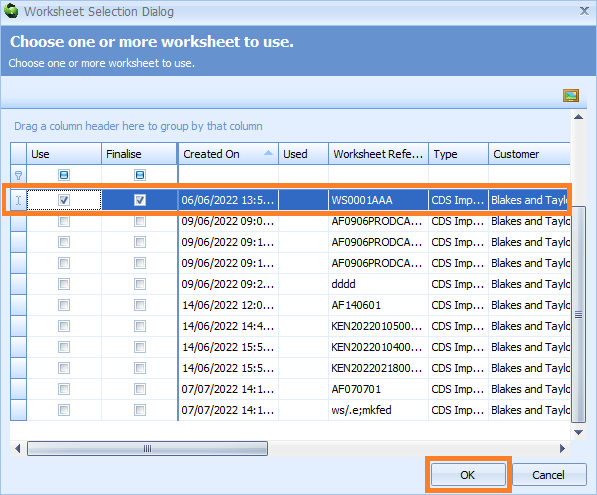
To do this, first click on the Import Worksheet button at the top of the Customs Warehouse Stock Record.
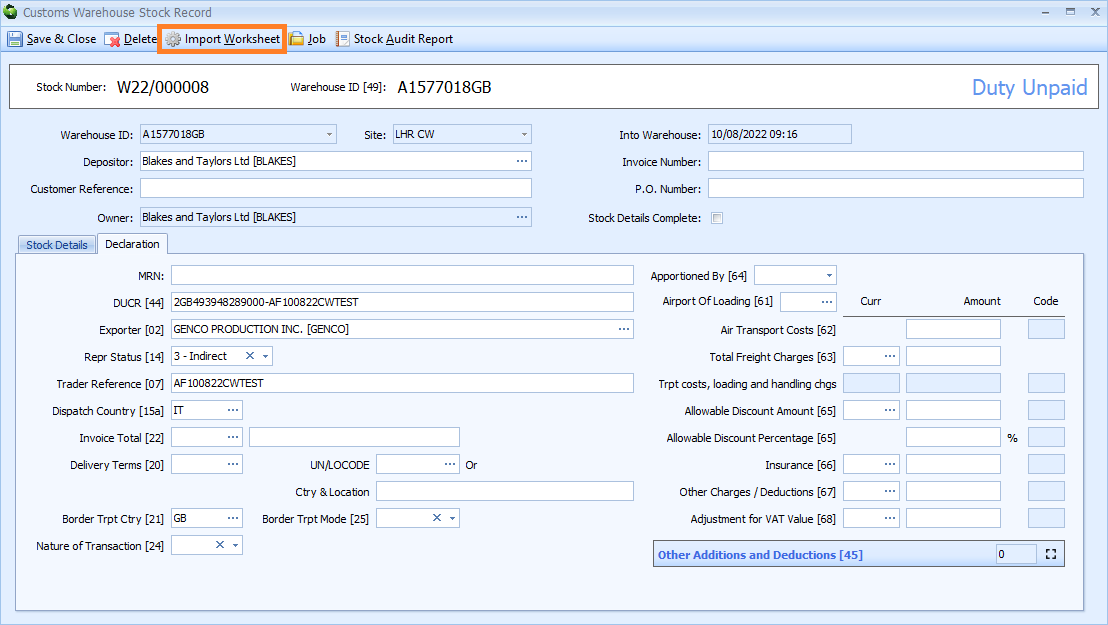
A Worksheet Selection Dialog box will appear. Put a tick in the square box or boxes in the Use column next to the worksheet or worksheets that you wish to import, and then click on the OK button.
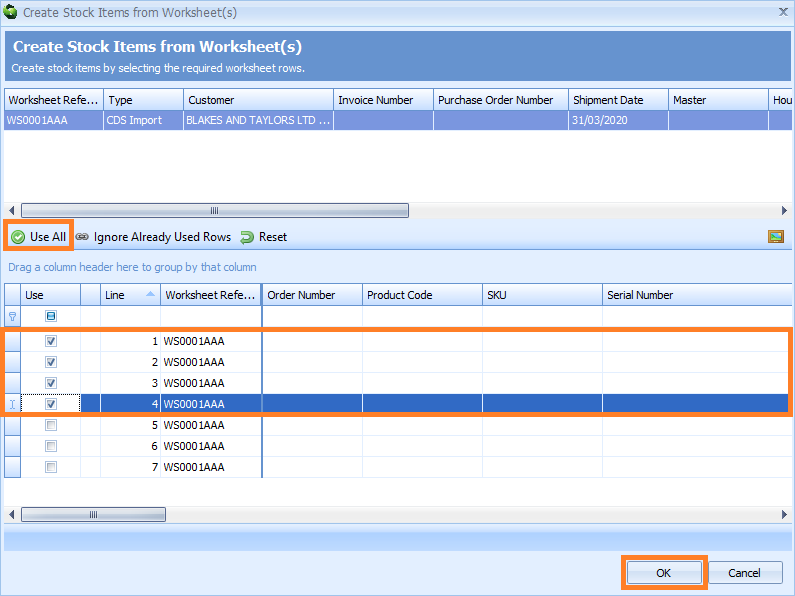
A Create Stock Items from Worksheet(s) dialog box will appear. Put ticks in the square boxes in the Use column next to the stock items that you wish to add to the Stock Items section of the Customs Warehouse Stock Record. If you want to select them all, click on the Use All button. Then, click on the OK button.
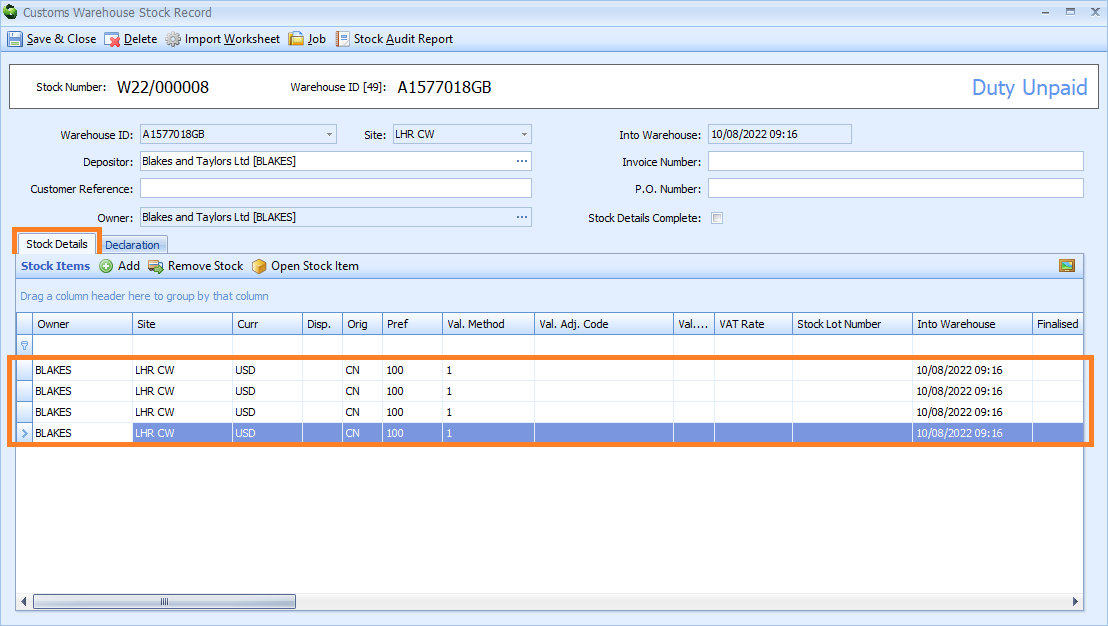
You will return to the Customs Warehouse Stock Record editor and see that the stock items have been added to the list in the Stock Details tab.
Add Stock Items Manually
To add stock items manually, click on the Stock Details tab on the Customs Warehouse Stock Record editor and click on the Add button. A row will appear. Click in each column in the row and type in the stock item information manually. To add more stock items, click on the Add button again and repeat the process.
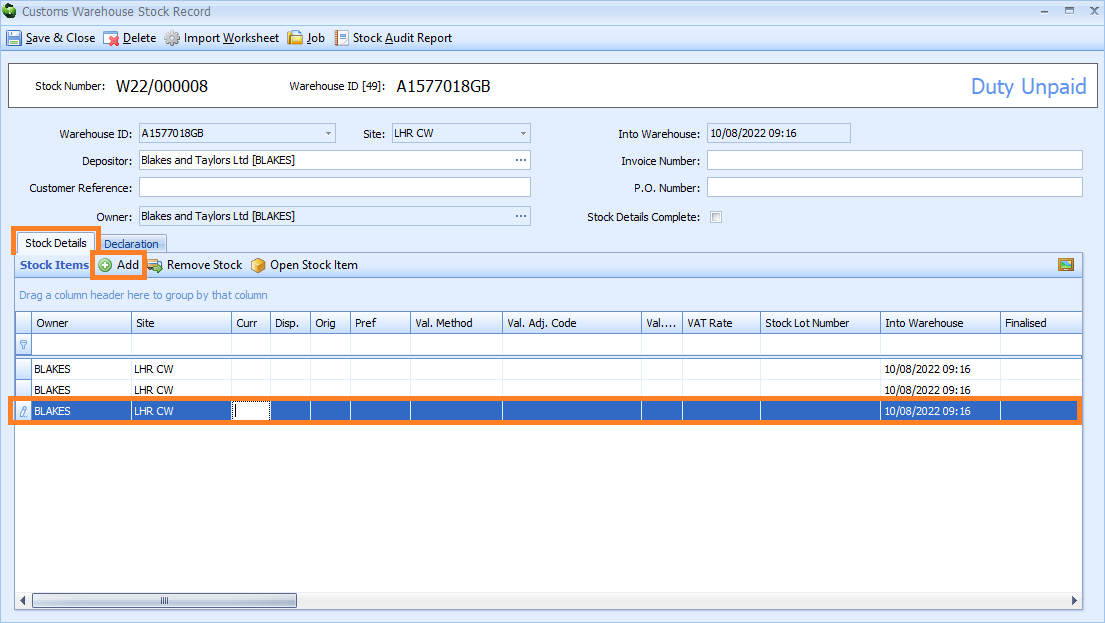
The table below describes the information that can be entered into each column.
| Box | Information |
|---|---|
| Owner | The owner of the stock item |
| Site | The warehouse site of the stock item |
| Curr | The currency in which the value of the stock item has been declared |
| Disp. | The dispatch country of the stock item |
| Orig | The country of origin of the stock item |
| Pref | The Tariff Preference of the stock item |
| Val. Method | The method of valuation of the stock item. For more information click here |
| Val. Adj. Code | The valuation adjustment code of the stock item |
| Val. Adj. % | The valuation adjustment percentage of the stock item |
| VAT Rate | The VAT rate of the stock item |
| Stock Lot Number | A unique reference for this stock item that is generated by Sequoia |
| Into Warehouse | The date that the stock item and was entered into the warehouse |
| Finalised | The date/time that the last of the goods on this stock item were removed from the warehouse |
| Qty Received | The quantity of this stock item initially received into the warehouse |
| Qty Remaining | The quantity of this stock item remaining in the warehouse |
| Value Received | The value of this stock item initially received into the warehouse |
| Value Remaining | The value of this stock item remaining in the warehouse |
| Product Code | The product code of the stock item |
| SKU | The SKU (Stock Keeping Unit identification number) of the stock item |
| Serial Number | The serial number of the stock item |
| Description | The description of the stock item |
| Purchase Order | The purchase order number of the stock item |
| Invoice Number | The invoice number of the stock item |
| Unit Price | The unit price of the stock item |
| Commodity Code | The commodity code of the stock item |
| CAC | The commodity additional code of the stock item |
| CPC | The customs procedure code of the stock item |
| Gross Mass | The gross mass in kilograms (to 3 decimal places) of the stock item being declared. This box needs to be completed if freight charges are to be apportioned by mass |
| Gross Mass Remaining | The gross mass in kilograms (to 3 decimal places) of the stock item remaining in the warehouse |
| Net Mass | The net mass in kilograms (to 3 decimal places) of the stock item. This must be greater than zero. This infomation may be used for revenue calculation |
| Net Mass Remaining | The net mass in kilograms (to 3 decimal places) of the stock item remaining in the warehouse. This infomation may be used for revenue calculation |
| Quota | The tariff quota order number for the stock item. Tariff quotas let you import a certain amount of specific goods at a lower rate of duty |
| Third Quantity | A third quantity is a quantity whose units are related to the item and is required by certain commodities in order to calculate revenue. The quantity can be expressed up to three decimal places. When supplied it must be greater than zero unless being used with certain specific CPCs |
| Customer Reference | Optionally enter the reference supplied by the customer in this box |
Edit Stock Items
In the Customs Warehouse Stock Record editor, click on the Stock Details tab. To view or edit the details of a stock item, right click on it in the Stock Items list and select Open Stock Item.
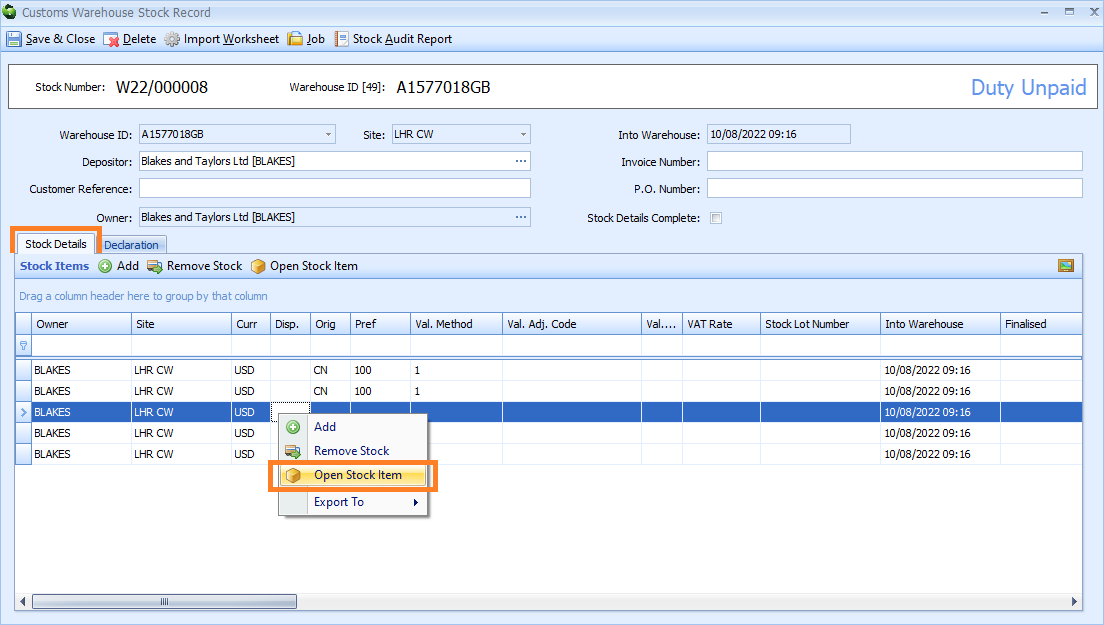
A Customs Warehouse Stock Item editor will appear.
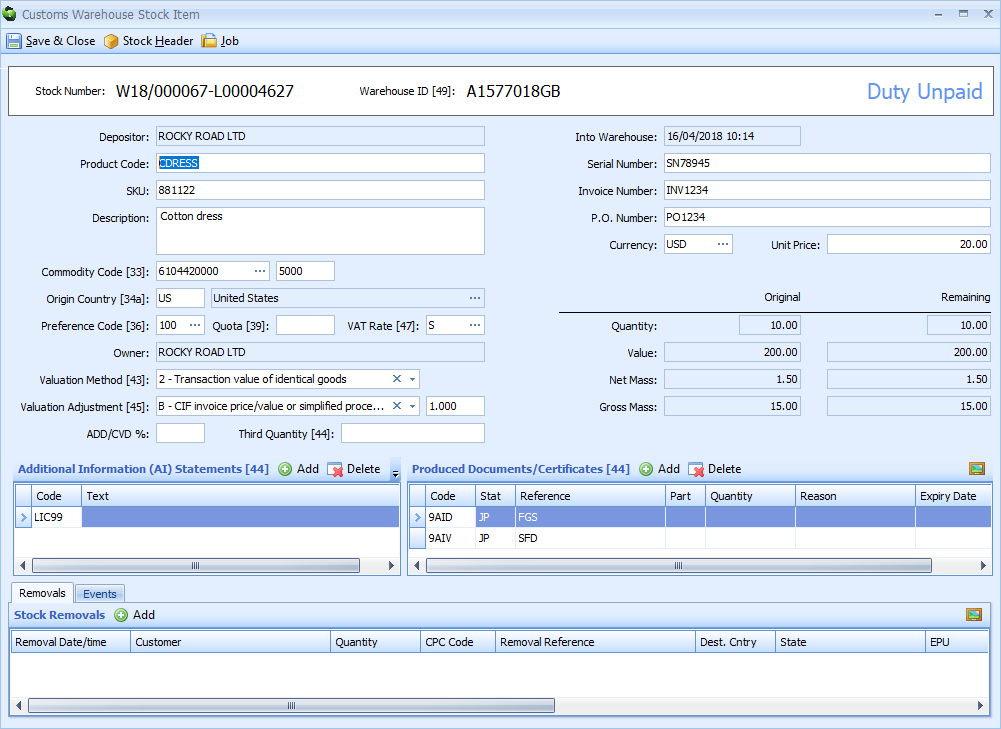
If Anti-Dumping or Countervailing Duty is applicable, the percentage can be added to the ADD/CVD % box.
If you want to amend the quantity of stock or change the owner of the stock you will need to perform a Stock Adjustment or a Change Owner event. Click here to learn how to do that.
Step 6: Complete and Close the Stock Record
Once you have added all the stock items and necessary declaration information into the Customs Warehouse Stock Record, put a tick in the Stock Details Complete box to show that the record is complete. Then, click on the Save & Close button.
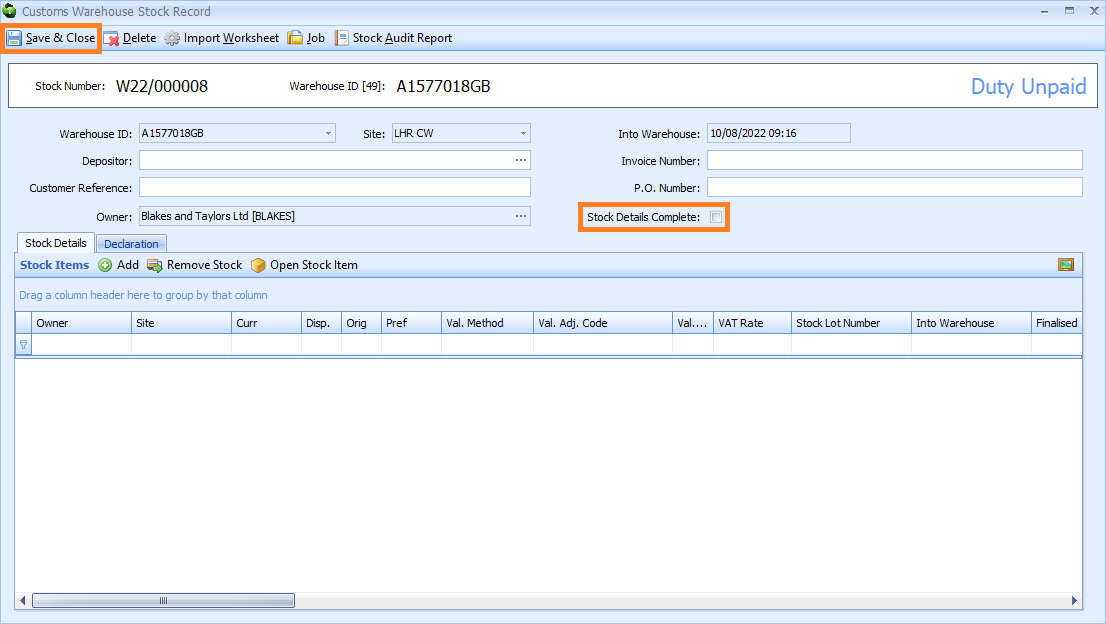
This Customs Warehouse Stock Record will now no longer appear in Stock Details Incomplete folder.
