
Sequoia Configuration - Transit (NCTS)
Overview
The Sequoia Configuration application allows you to configure the details for your NCTS functionality. The configuration requires the addition of at least one profile, together with a badge code (this is a dummy code used when configuring the gateway) and the NCTS Gateway settings themselves. The NCTS Gateway handles the communications between Sequoia and the HMRC NCTS system.
Profiles
An NCTS profile is designed to capture information that is declared within every transit declaration. It also contains information received as part of your NCTS authorisation with HMRC.
If you are setting up as a broker, please also refer to the Setting up as a Transit Broker section.
To add a new profile, navigate through Sequoia Enterprise Management in the Sequoia Configuration application and expand the Configuration node where you will find NCTS Profiles.
Right-click the NCTS Profiles node and choose New... from the context menu.
A <New Profile> node will be displayed. Select this and the profile editor will be displayed.
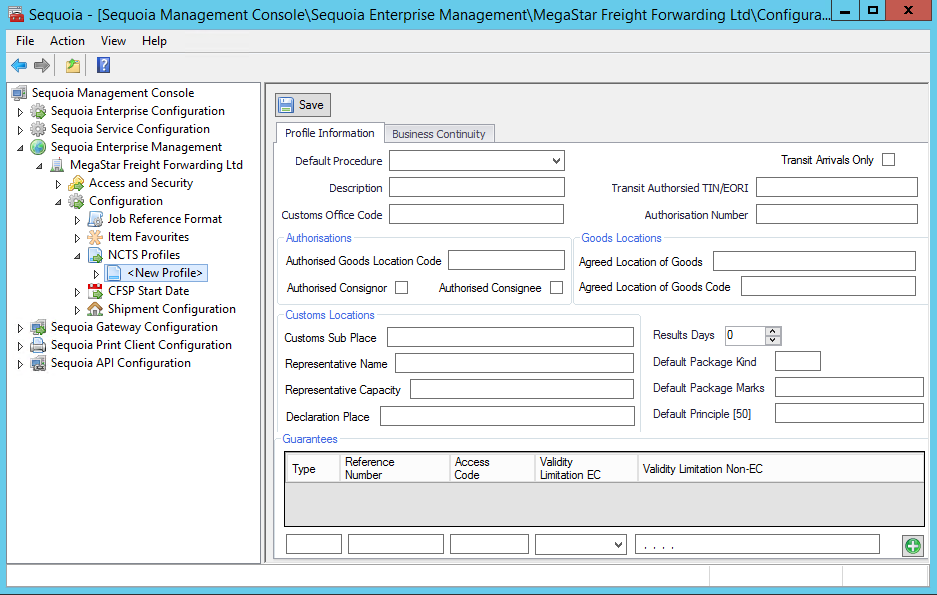
The Transit Arrivals Only checkbox should be ticked if the profile is only to be used for arriving transit movements.
| Label | Information required |
|---|---|
| Default Procedure | This will determine the default option when the user is completing the declaration. Note Simplified can only be set if Authorised Consignor/Consignee is set. |
| Description | A short description for the profile. This will be visible to the user when completing the declaration. |
| Transit Authorised TIN/EORI | The EORI authorised by NCTS for the submitting of declarations. The EORI is used to link with the gateway settings and determines how Sequoia authenticates with the NCTS web service. Please note, if this profile is for your customer and you have your own NCTS accreditation, then this should be set to your accredited EORI. |
| Customs Office Code | The departure office as detailed in the accreditation. Maps to the Departure Office [C] on the declaration. |
| Authorisation Number | Deprecated. Please ignore. |
| Authorised Goods Location Code | The authorised goods location as detailed in the accreditation. Required for Authorised Consignor or Consignee. Maps to the Authorised Location [30] for simplified declarations. |
| Authorised Consignee / Consignor | Indicate whether accreditation gives Authorised Consignee and/or Authorised Consignor status. |
| Agreed Location of Goods | Maps to the Agreed Location [30] for normal (non-simplified) declarations. |
| Agreed Location of Goods Code | Maps to the Agreed Location [30] for normal (non-simplified) declarations. |
| Customs Sub Place | Maps to Customs Sub Place for normal (non-simplified) declarations. |
| Representative Name | Maps to the Representative Name [50] on the declaration. |
| Representative Capacity | Maps to the Representative Capacity [50] on the declaration. |
| Declaration Place | Maps to Declaration Place [50] on the declaration. |
| Results Days | Used to set the Date Limit on simplified declarations to the current date plus this number. |
| Default Package Kind | Maps to Package Kind [31] on declaration item(s). |
| Default Package Marks | Maps to Package Marks and numbers [31] on declaration item(s). |
| Default Principle [50] | You can specify a CRM Account shortcode to use as the Principle [50] in the declaration. Note, you can set an account to always be used as the Principle [50] in CRM but this setting within the profile provides an override capability. |
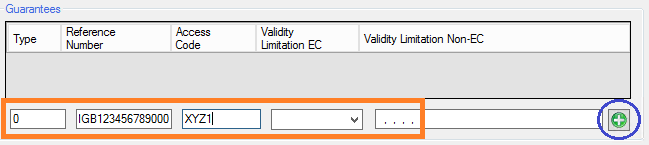
| Guarantees | Add details of the transit guarantee(s). Each guarantee record should be added to the highlighted boxes below the grid (see image). Click the green plus button to add the details to the grid; the boxes will then be available to allow another guarantee to be added. The guarantee details will be added to the Guarantees [52] section of the declaration. It is mandatory to add a guarantee to a transit profile. If you are using the Sequoia Transit module as a broker, see the Setting up as a Transit Broker section |
Once the profile has been configured, click the Save button at the top of the profile.
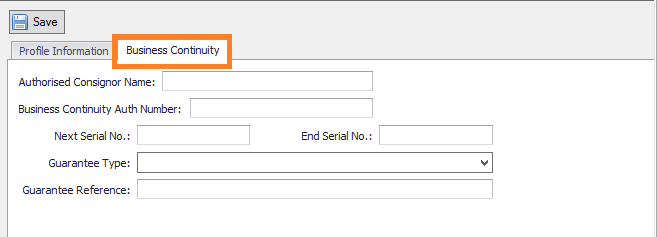
Business Continuity
The Business Continuity tab of the profile is optional and is used to configure the authorisation details to use when fallback procedures are invoked. When fallback procedures are in place the user will be able to print a TAD report with the Business Continuity stamps in place of the MRN.
| Label | Information required |
|---|---|
| Authorised Consignor Name | The name of the authorised consignor. |
| Business Continuity Auth Number | The Business continuity authorisation number. |
| Next Serial No. | The first number to be used when printing the TAD. This number will automatically increment as each report is generated. |
| End Serial No. | The last number to be used. A warning is shown in Sequoia when the current batch of numbers is running low. |
| Guarantee Type | The type of the guarantee. |
| Guarantee Reference | The reference number of the guarantee. |
Setting up as a Transit Broker
It is possible to configure and use Sequoia as a 'broker', for example where you submit transit declarations on behalf of companies with their own transit guarantees but you don't necessarily have a guarantee of your own.
This walkthrough assumes the badge and communications gateway have already been setup.
Taking the example of a fictitious Sequoia Enterprise, MegaStar Freight, handling transit work on behalf of their customer, Widget Exports, the following would need to be setup:
- A profile created for Widget Exports with their own transit authorisation details.
- This profile should be configured with details from Widget Exports own transit authorisation (whether they are an Authorised Consignor/Consignee, their Authorised Location and their guarantee reference and type etc).
- The Description should be something recognisable to the end user creating the transit declaration, e.g. "Widget Exports".
- Note, the Transit Authorised TIN/EORI would always be MegaStar Freight's authorised Transit EORI. This would be the same for all other profiles created on behalf of MegaStar Freight.
- The guarantee for Widget Exports should be added to the profile. It should also be configured within the Sequoia Client if guarantee management functionality is required (ie, adding the amount under guarantee to each transit movement). Refer to Managing Guarantees for more details on how to do this.
- Once this has all been setup and configured, any transit declaration created using the Widget Exports profile would be submitted to the NCTS system using MegaStar Freight's logon credentials but would contain Widget Exports own transit authorisation data.
Badge
The Sequoia messaging infrastructure requires an NCTS badge to be added. Please refer to the section on configuring badges in the Sequoia Configuration application.
The badge code is arbitrary and can be any value (we would suggest 'NCT' to distinguish it from other badge codes configured in Sequoia).
The badge should be added to the NCTS security role - refer to the section on adding and configuring security roles in the Sequoia Configuration application.
If multiple profiles have been created but they have the same Transit Authorised TIN/EORI, then only a single badge is required.
However, in the unlikely event multiple profiles have been created with differing Transit Authorised TIN/EORI values, then a badge will be required for each of these profiles.
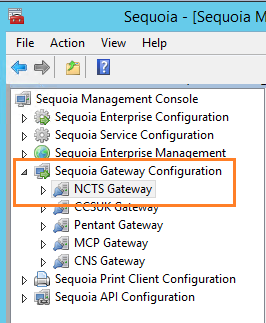
Gateway
The NCTS Gateway controls the sending and receiving of messages between Sequoia and the HMRC NCTS system.
The gateway is installed by default and can be accessed from the Sequoia Gateway Configuration section of the Sequoia Configuration application.
Gateway Application Settings
The Application Settings page of the NCTS Gateway defines how Sequoia connects to the NCTS web service.
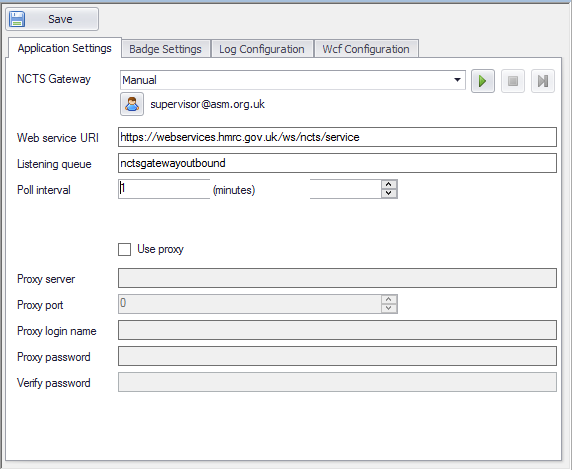
The Web service URI and Listening Queue values should not be changed unless under guidance from the ASM Helpdesk.
The Poll Interval governs how often, in minutes, Sequoia connects to the NCTS web service to check for inbound messages. Note, outbound messages (your declarations) are sent 'on demand'.
If a proxy server is used to connect to the NCTS web service then Use Proxy should be checked and the proxy server settings added. These details would be provided by your own IT department.
Click the Save button after making changes.
Gateway Badge Settings
The Badge Settings page of the NCTS Gateway defines how Sequoia authenticates with the NCTS web service.
![]()
The configured badge should be added (click the Add button and enter the badge code setup earlier).
| Label | Information required |
|---|---|
| Traders Id (TID) | Should be set to the Transit Authorised TIN/EORI configured in the profile. |
| Company Name | The name of your organisation. |
| Login Name | The login name given to your organisation to access the NCTS system. |
| Password / Verify Password | The login password given to your organisation to access the NCTS system. |
| Response Queue | This should be left as default unless under guidance from the ASM Helpdesk. |
| Last Transaction ID | This number is used when communication with the NCTS web service to retrieve messages. If you are migrating from a system where you were using NCTS before, then this number should be the last number used on that system. This number will automatically increment every time messages are received from the NCTS web service. It should not be changed once the Sequoia NCTS system is in use. Changing the number could result in old messages being retrieved (if the ID was decremented) or new messages missed (if the ID is incremented). |
Click the Save button after making changes.