How to Create an Air Import Job
Overview
A Job contains all the records and documentation related to a consignment of goods that a customer wants you to move from one place to another. From within your Job you can conveniently make customs declarations, add cost and sales amounts, create collection and delivery notes and raise invoices. You can also add any documents related to your Job.
Create an Air Import Job
There are two ways to start creating an Air Import Job:
Either
1) Click on the Imports module at the bottom left hand side of the screen. Then, click on the Air Jobs folder at the top left hand side of the screen. Next, right click on the list area of the screen and a context menu will appear. Click on New in the context menu.
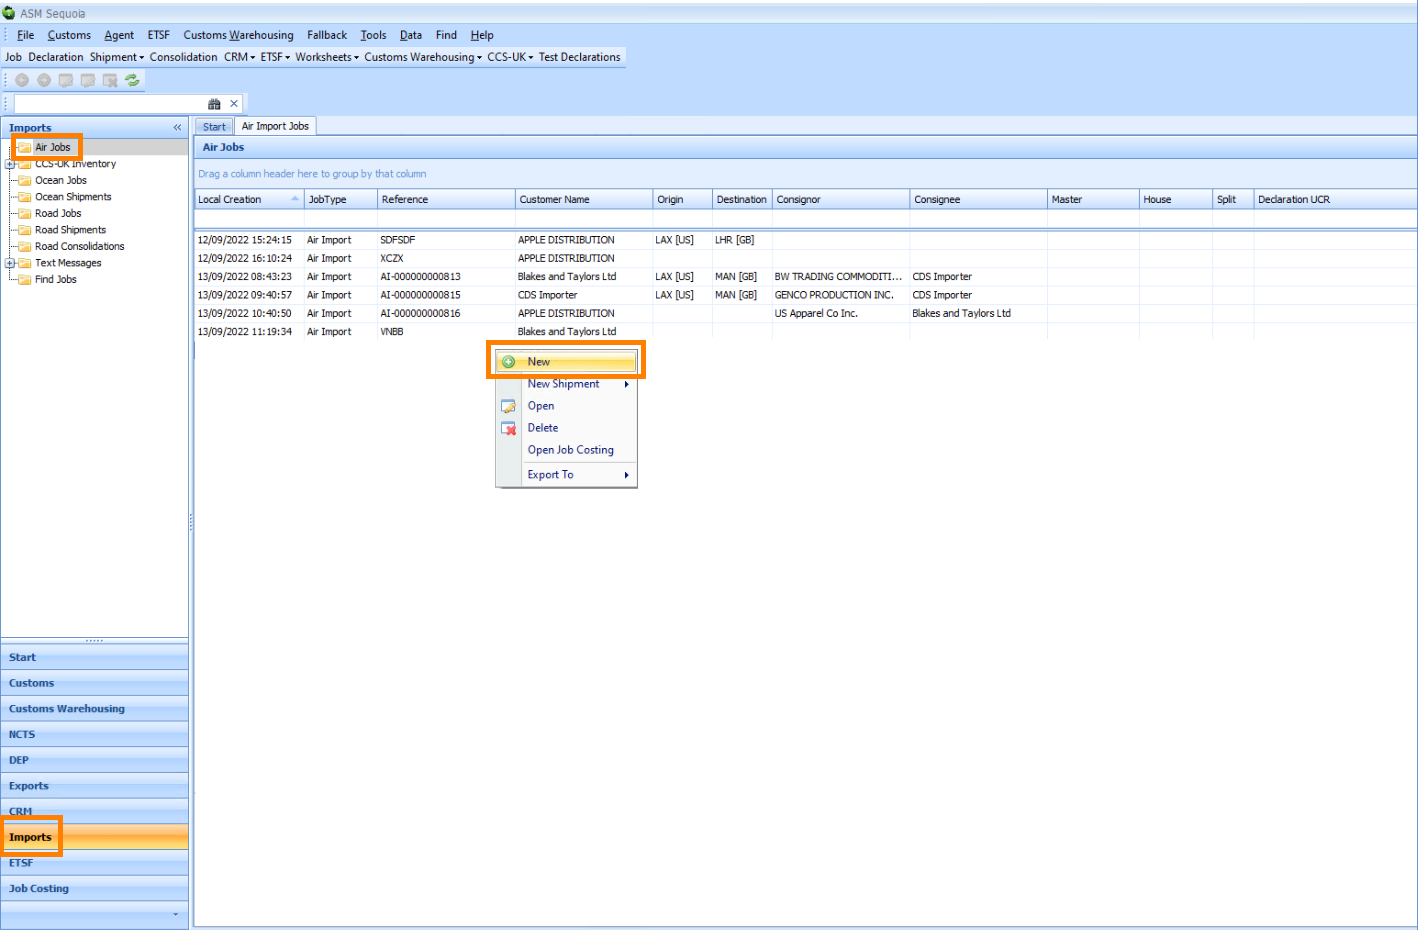
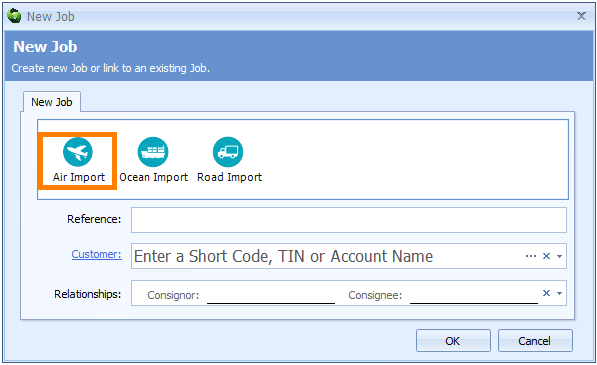
A New Job dialog box will appear. Click on the Air Import icon.
or
2) Select File from the main Sequoia toolbar at the top left hand side of the screen. A context menu will appear. Click on New followed by Job in the context menu.
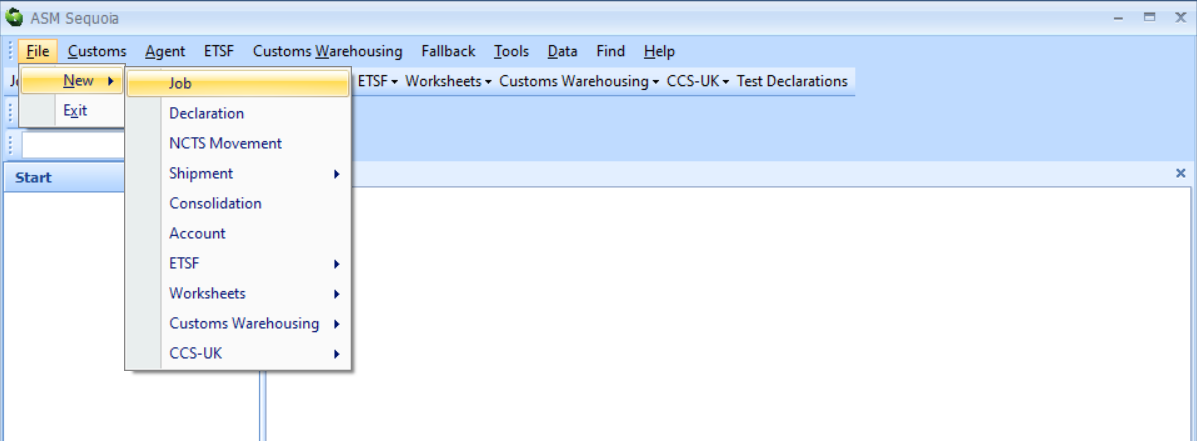
A New Job dialog box will appear. Click on the Air Import icon.
![]()
If you create your Job this way then you will see that the New Job dialog box also includes Export Job icon options.
Next, enter the information described in the table below into the boxes of the New Job dialog box:
| Box | Information |
|---|---|
| Reference | Create your own reference for this Job and enter it into this box If you have set up Sequoia to automatically generate Job references for you then you can leave this box blank and Sequoia will automatically enter a Job reference into it. To learn how to set up Sequoia to automatically generate Job references for you click here |
| Customer | You must enter either your customer's name, Short Code, or EORI/ TIN number into this box You can select this information from a list by either typing a ? into this box or by clicking on the ellipsis (the 3 dots) to the right of this box to display the Account Lookup Dialog box. Next, enter the information or part of it into the search box, click on the binoculars icon to search for it and then select it from the resulting list by double clicking on it |
| Relationships | Enter the details of the consigner (the person sending the shipment) and the consignee (the person receiving the shipment) You can select this information from a list by clicking on the |
Next, click on the OK button at the bottom of the New Job dialog box. An Air Import editor will appear:
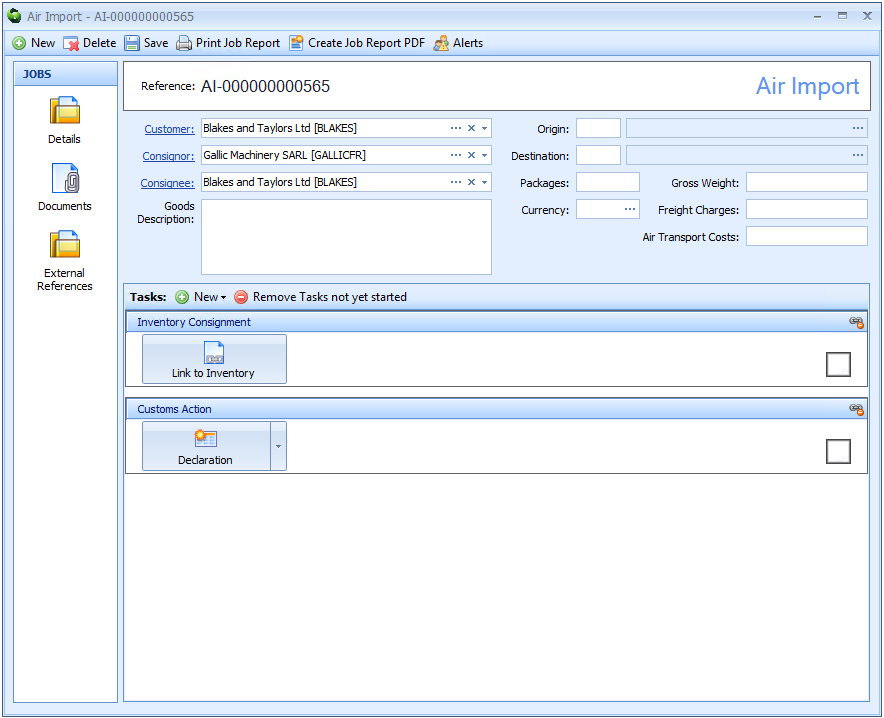
Next, enter the information described in the table below into the Air Import editor boxes:
| Box | Information |
|---|---|
| Customer | The customer information that you entered when you first created the Job via the New Job dialog box will be automatically entered into this box |
| Consignor | The consignor (the shipper) This box will automatically display the consignor (the shipper) information that is entered into the Relationships box when you first created the Job via the New Job dialog box. When you create a declaration for this Job the name and address of the consignor that is entered here will be automatically added to the Consignor box [box 2] of that declaration |
| Consignee | The consignee (the receiver) This box will automatically display the consignee (the receiver) information that you entered into the Relationships box when you first created the Job via the New Job dialog box. When you create a declaration for this Job the name, address and EORI number of the consignee that is entered here will be automatically added to the Consignee box [box 8] of that declaration |
| * Goods Description | A description of the goods being imported When you create a declaration for this Job, what is entered here will be automatically added to the Goods Description box [box 31] of the first item of that declaration |
| * Origin | The IATA airport code of where the goods are coming from When you create a declaration for this Job, what is entered into this box will be automatically added to the Dispatch Country box [box 15a] of that declaration. You can select this information from a list by either typing a ? into this box or by clicking on the ellipsis (the 3 dots) to the right of this box to display the Origin Lookup Dialog box. Next, enter the code or part of the code into the search box, click on the binoculars icon to search for it and then select it from the resulting list by double clicking on it |
| * Destination | The IATA airport code of where the goods are going to You can select this information from a list by either typing a ? into this box or by clicking on the ellipsis (the 3 dots) to the right of this box to display the Destination Lookup Dialog box. Next, enter the code or part of the code into the search box, click on the binoculars icon to search for it and then select it from the resulting list by double clicking on it |
| * Packages | The number of packages in the consignment When you create a declaration for this Job the what is entered here will be automatically added to the Total Packages box [box 6] of that declaration |
| * Gross Weight | The gross weight of the consignment |
| Currency | The currency of any freight charges You can select this information from a list by either typing a ? into this box or by clicking on the ellipsis (the 3 dots) to the right of this box to display the Currency Lookup Dialog box. Next, enter the code or part of the code into the search box, click on the binoculars icon to search for it and then select it from the resulting list by double clicking on it. If entered, when you create a declaration for this Job, what is entered here will be automatically added to the Freight Charge Currency box [box 63] of that declaration |
| Freight Charges | The cost of any freight charges If entered, when you create a declaration for this Job, what is entered here will be automatically added to the Freight Charge Amount box [box 63] of that declaration |
| Air Transport Costs | The amount of any air transport costs If entered, when you create a declaration for this Job, what is entered here will be automatically added to the Air Transport Costs [box 62] of that declaration |
If you have created this Job from within an inventory record then the boxes marked with an * in the table above will be pre-filled with information taken from that inventory record.
If you fill in the boxes marked with a * in the table above before linking the Job to an inventory record then they will be overwritten with information taken from any inventory record that you later link it to.
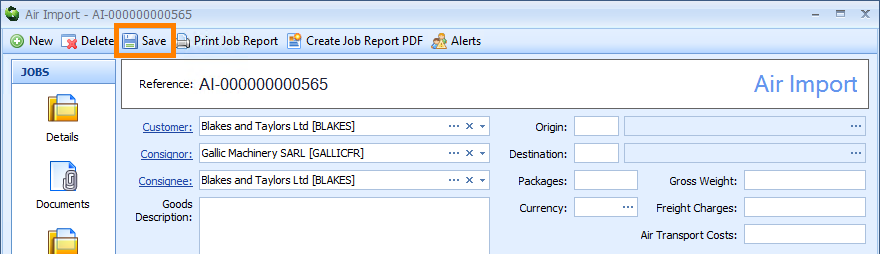
Next, click on the Save button on the toolbar at the top left hand corner of the Air Import editor.
Create an Air Import Job From Within a Related Inventory Consignment Record
An Air Import Job can also be created from within an existing inventory consignment record. Creating the Job in this way automatically links it to that inventory consignment record which will save you the effort of having to link it manually later. The Job record will also be automatically filled with information taken from that inventory consignment record which will also save you the effort of having to enter it manually.
Click on the Imports module at the bottom left hand side of the screen. Next, click on the small + next to the CCS-UK Inventory folder at the top left hand corner of the screen to reveal the CCS-UK Inventory sub folders. Next, click on the Consignments folder. A list of all your inventory consignments will appear in the list on the right hand side of the screen. Right click on the inventory consignment that you want to link your new Job to and a context menu will appear. Click on Job in the context menu.
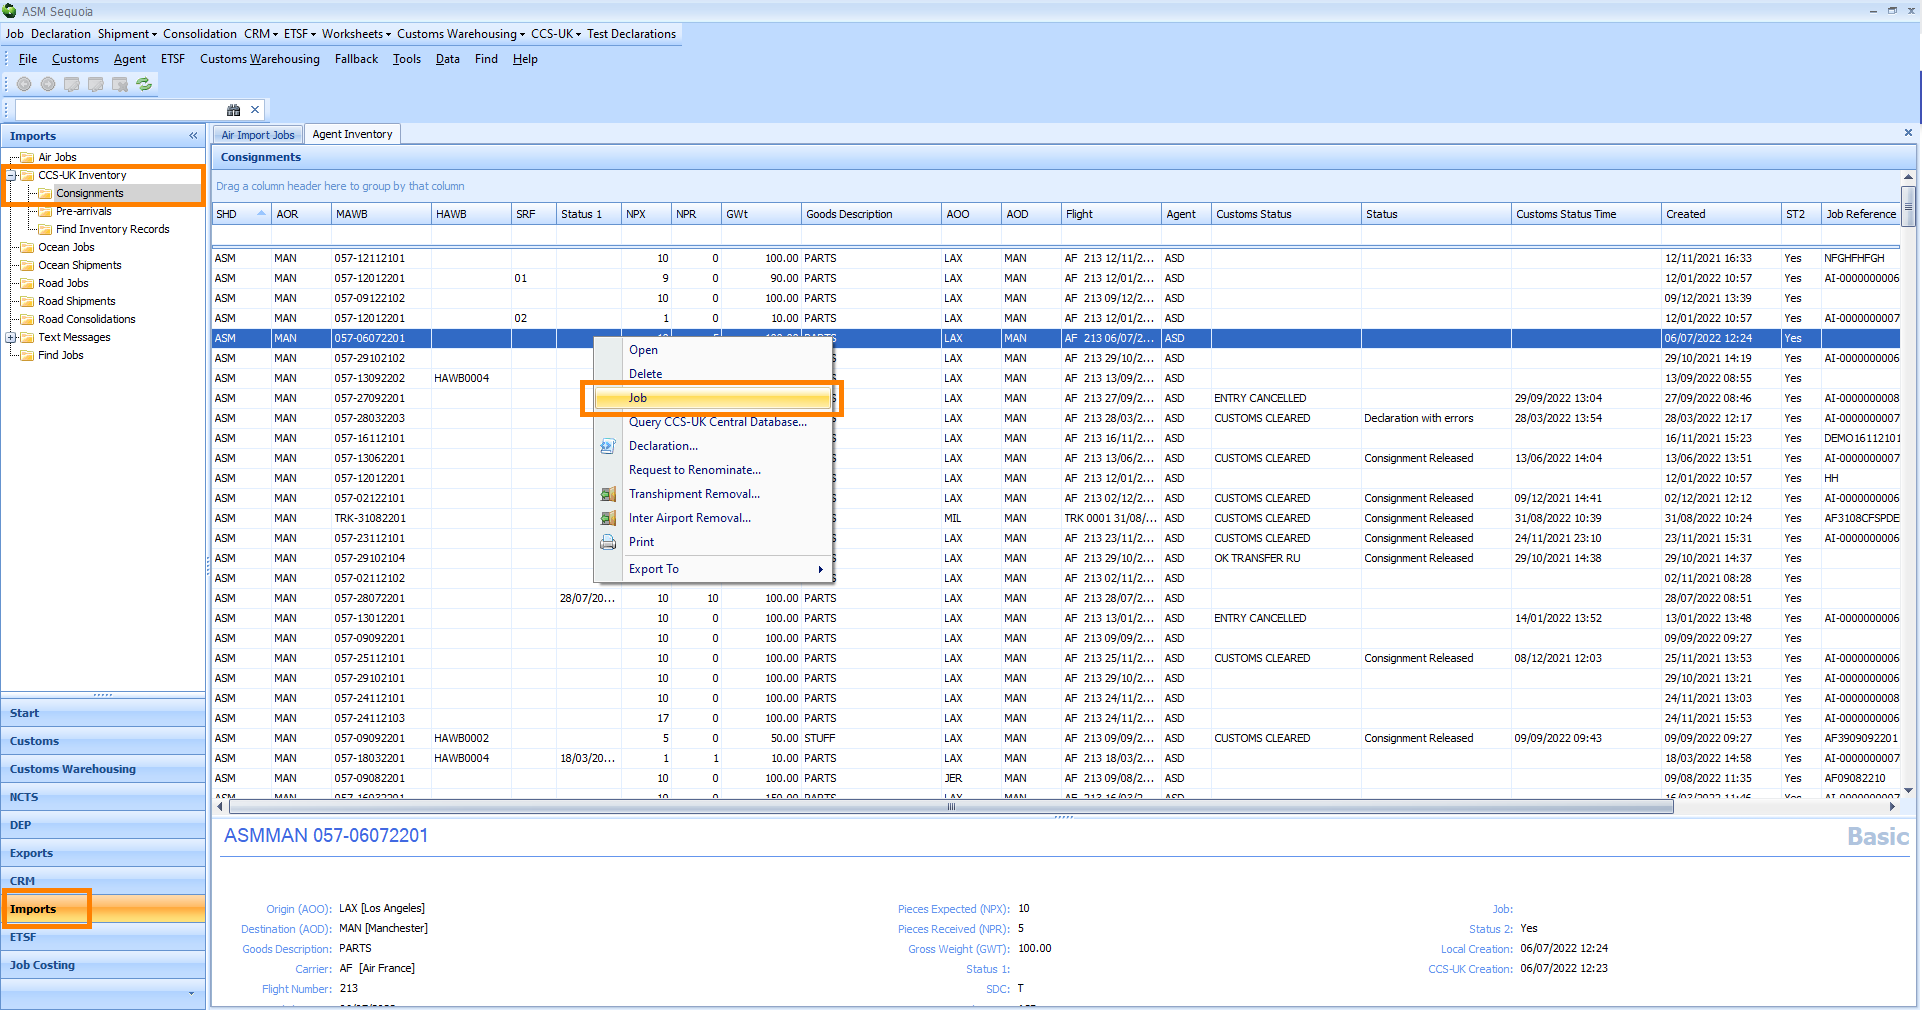
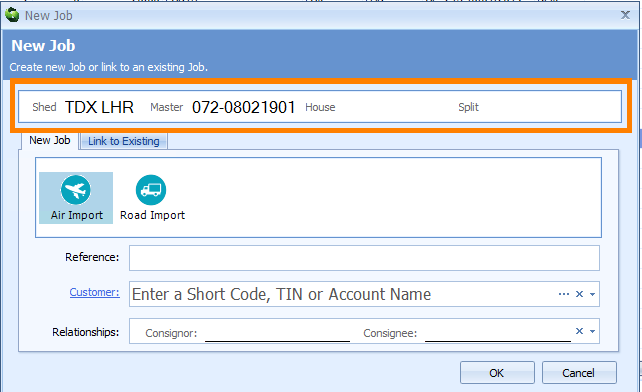
A New Job dialog box will appear and the Shed, Master, House and Split sections at the top of it will be automatically filled with information taken from the now linked inventory consignment record.
Next, follow the instructions in the 'Create an Air Import Job' section above to finish creating your Job.
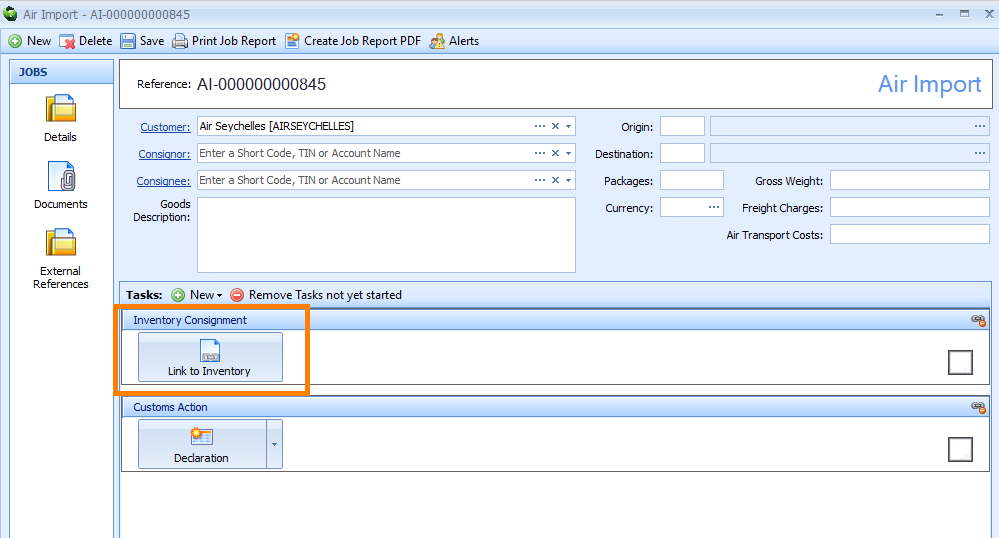
Link your Air Import Job to an Inventory Consignment Record
At the bottom of the Air Import editor there is a Tasks section. Click on the Link to Inventory button in the Inventory Consignment Tasks section.
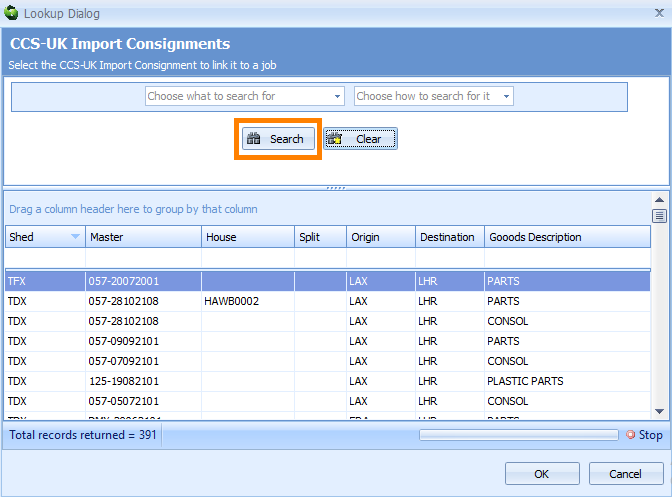
A CCS-UK Import Consignments Lookup Dialog box will appear. Click on the Search button and a list of CCS-UK inventory consignments that you can link your Job to will appear. To link your Job to a particular inventory consignment, double click on it.
The Inventory Consignment Tasks section of the Air Import editor will show the details of the inventory consignment to which the Job is now linked.
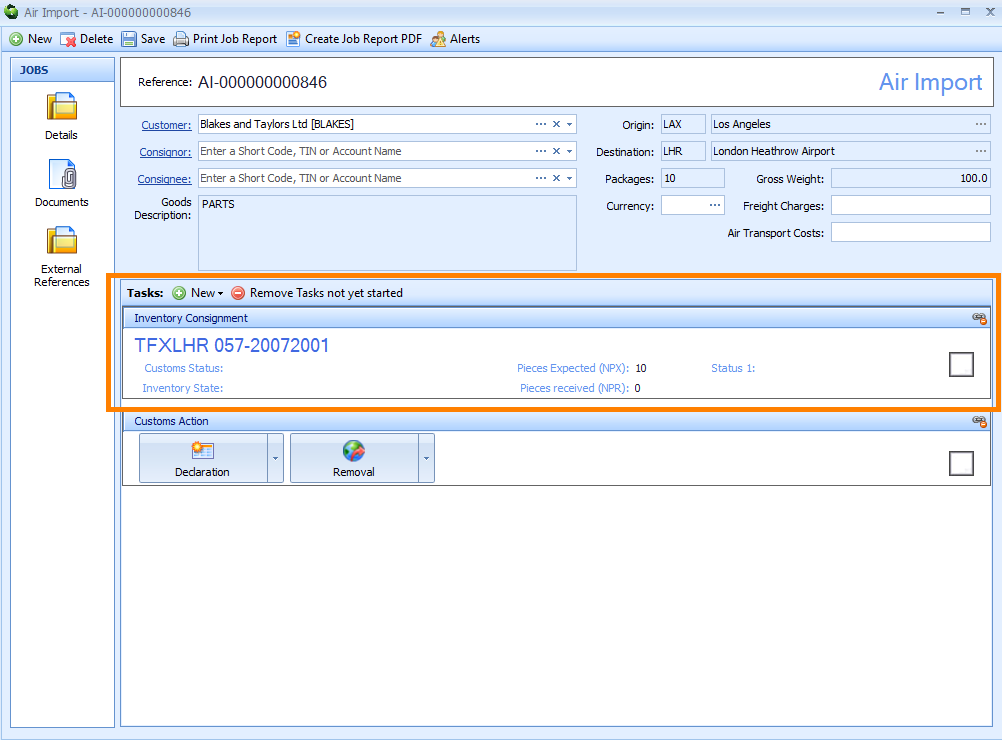
The image above also shows that the Customs Action Tasks section of the Air Import editor now displays a Declaration and a Removal Option. You can complete a declaration or a removal against an inventory consignment, but not both.
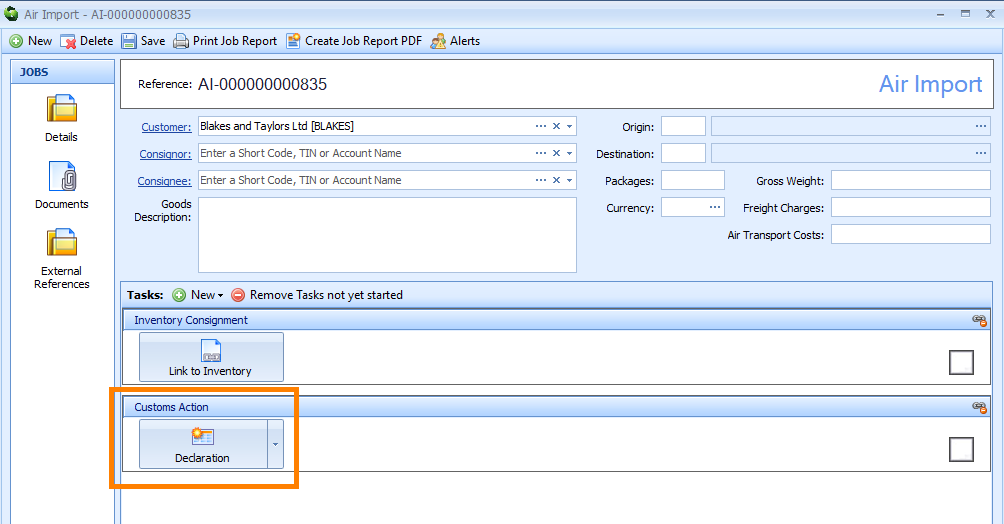
Add a Customs Import Declaration
To add a customs import declaration to your Job click on the Declaration button in the Customs Action Tasks section of the Air Import editor.
A New Customs Declaration dialog box will appear displaying a list of templates of different types of declarations.

Select the type of declaration by either double clicking on it or by clicking on it once and then clicking on the Create button. If you have not linked this Job to an inventory consignment a pop up box will appear asking you to confirm that the declaration is not linked to an inventory consignment. Next, the Import Declaration editor will appear. Alternatively, if you have linked this Job to an inventory consignment then the Import Declaration editor will appear with boxes automatically filled with information taken from that inventory consignment and any linked shipment record. Enter any missing data into the Import Declaration editor.
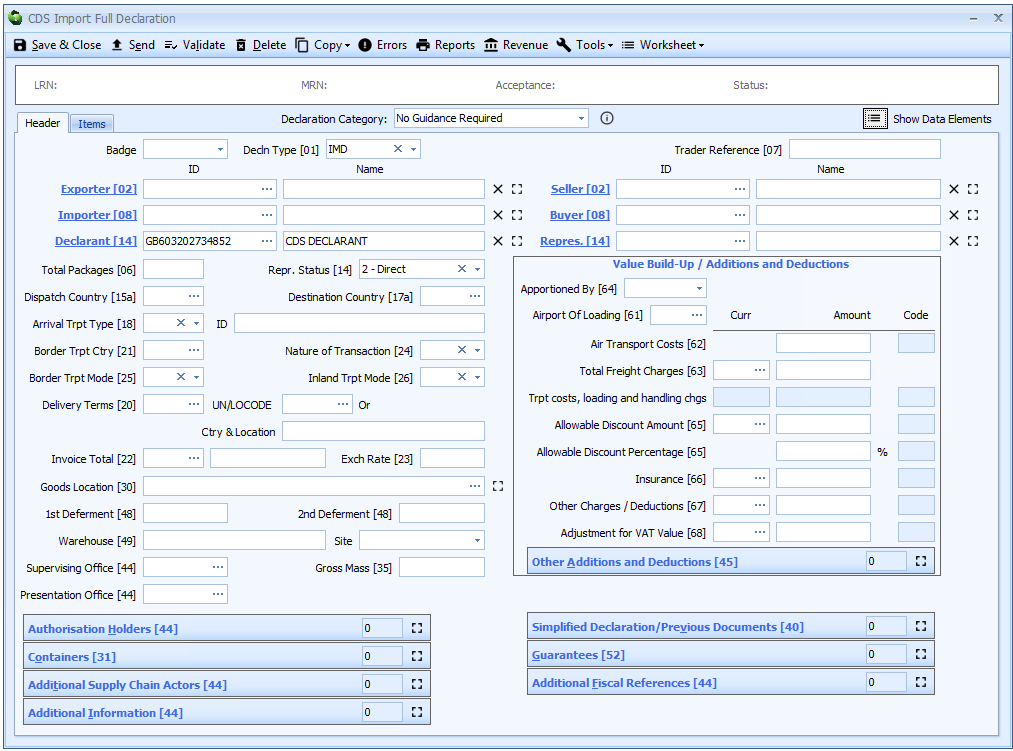
Below is an example of an Import Declaration editor:
Please note that you can create and save declarations in Sequoia before a related inventory consignment record is created. This can be useful if you want to prepare your documentation before the goods arrive and the inventory consignment is created.
To do this, create your declaration and save it. You do not have to enter the inventory reference/UCN into the declaration at this point. When you later link an inventory consignment record to a Job in Sequoia, information from that inventory consignment will be automatically added to any declarations in that Job when you next open the declaration editor.
Create a Removal Request
To create a removal request click on the Removal Option on the Customs Action Tasks section on the Air Import editor. Select either 'Transhipment Removal' or 'Inter Airport Removal' from the context menu:

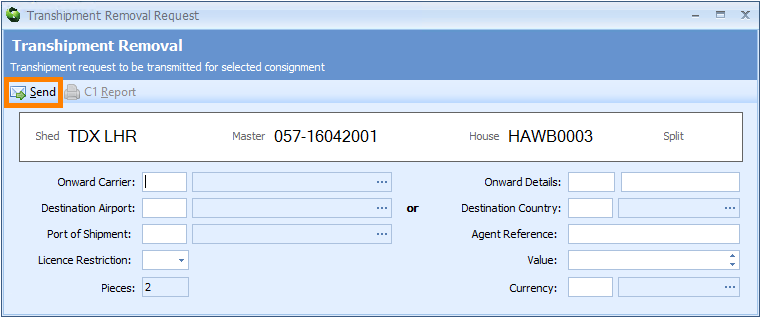
Transhipment Removals
A transhipment removal is used to remove goods from a Temporary Storage location (ETSF or ITSF) ready for export.
Fill in the boxes in the Transhipment Removal Request editor and click on Send on the toolbar at the top left hand corner of the editor to send the request to customs.
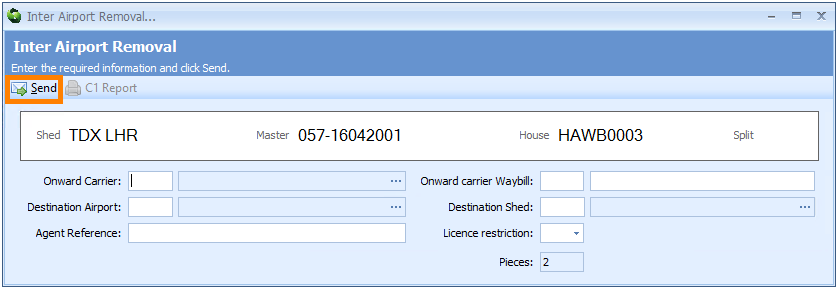
Inter Airport Removals
An Inter Airport Removal is used to move goods from one temporary storage location (ETSF or ITSF) to another one at a different airport.
Fill in the boxes in the Inter-Airport Removal Request editor and click on Send on the toolbar at the top left hand corner of the editor to send the request to customs.