
NCTS - Create a movement and link consignments
Create a NCTS Transit Movement
There are two ways to start creating a NCTS Transit Movement:
Either
1) Click on the NCTS module at the bottom left hand side of the screen. Then, click on either the Declarations or Arrivals folder at the top left hand side of the screen. Next, right-click on the list area of the screen and a context menu will appear. Click on New in the context menu.
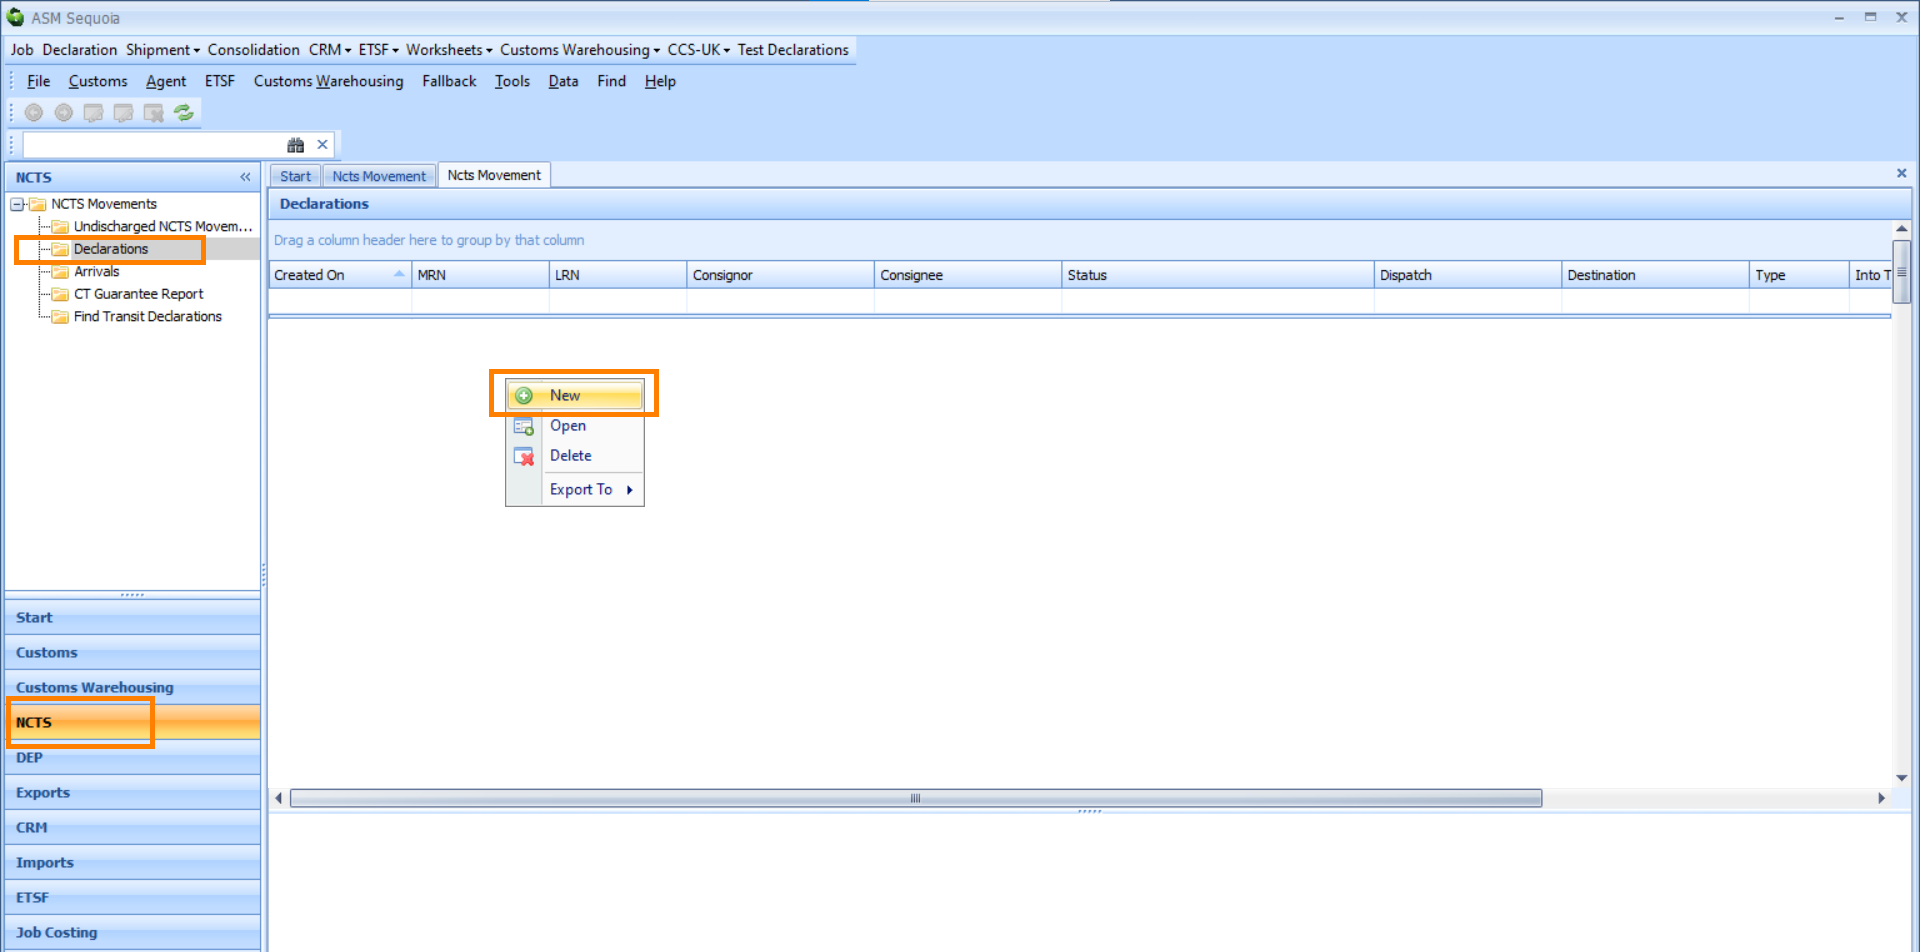
A New NCTS Transit Movement dialog box will appear. Click on either the Arrival or Declaration icon, depending on which type of Movement you are creating.

or
2) Select File from the main Sequoia toolbar at the top left hand side of the screen. A drop-down menu will appear. Click on New followed by NCTS Movement.
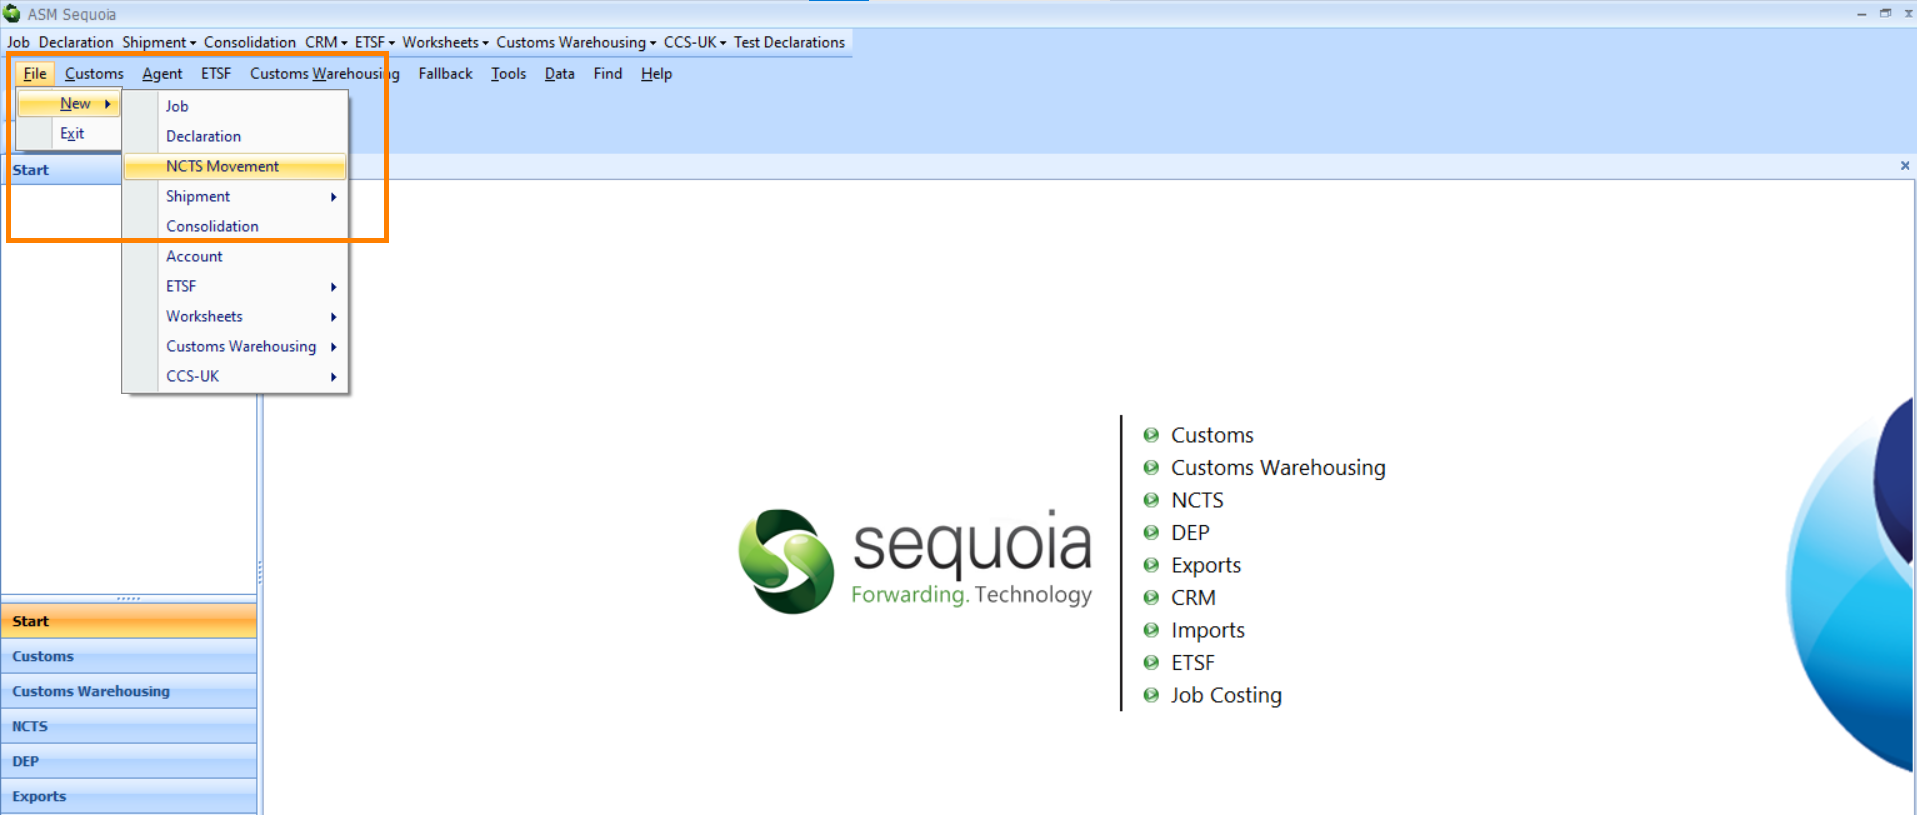
A New NCTS Transit Movement dialog box will appear. Click on either the Arrival or Declaration icon, depending on which type of Movement you are creating.
Next, enter the information described in the table below into the boxes of the New NCTS Transit Movement dialog box:
| Box | Information required |
|---|---|
| Reference [LRN] | You must create your own unique Local Reference Number (LRN) and enter it into this box This reference can be anything you choose and will allow you to identify this Movement in your records. It is only technically required for a declaration, but also must be entered here to create a Movement record in Sequoia |
| Consignor | The consignor (the shipper) Enter either the name, Short Code or EORI/ TIN number of the consignor. You can select this information from a list by either typing a ? into this box, or by clicking on the ellipsis (the 3 dots) to the right of this box to display the Account Lookup Dialog box. Next, enter the code or part of the code into the search box, click on the binoculars icon to search for it, and then select it from the resulting list by double clicking on it or by clicking on it once and pressing the return key |
| Consignee | The consignee (the receiver) Enter either the name, Short Code or EORI/ TIN number of the consignee. You can select this information from a list by either typing a ? into this box, or by clicking on the ellipsis (the 3 dots) to the right of this box to display the Account Lookup Dialog box. Next, enter the code or part of the code into the search box, click on the binoculars icon to search for it, and then select it from the resulting list by double clicking on it or by clicking on it once and pressing the return key |
Next, click on the OK button at the bottom of the New NCTS Transit Movement dialog box. A NCTS Transit Movement editor will appear.
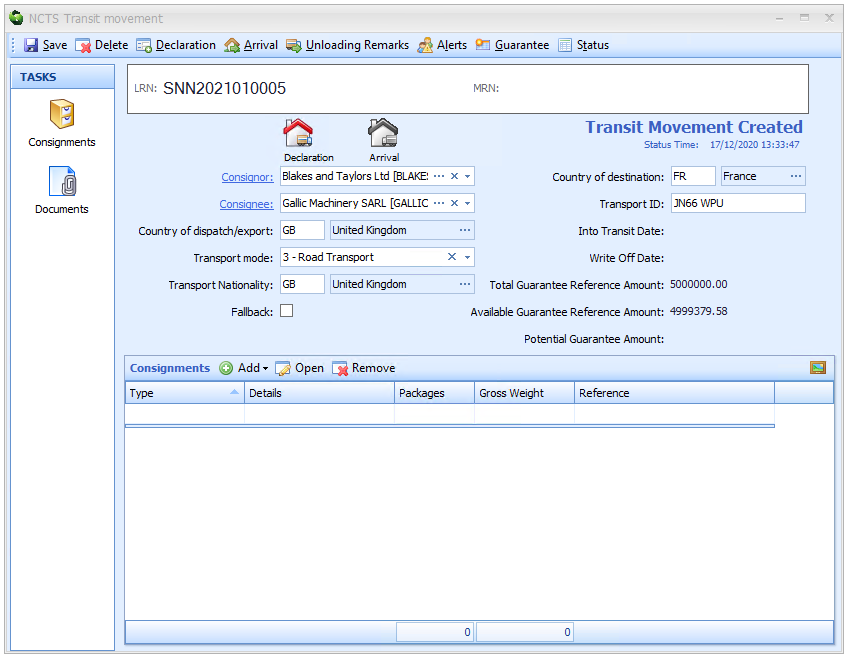
Next, enter the information described in the table below into the NCTS Transit Movement editor boxes. Most of this information will be automatically entered into any declaration you create that is linked to this Movement going forward.
| Box | Information required |
|---|---|
| Consignor | The consignor (the shipper) Enter either the name, Short Code or EORI/ TIN number of the consignor. Select this information from a list by either typing a ? into this box, or by clicking on the ellipsis (the 3 dots) to the right of this box to display the Account Lookup Dialog box. Next, enter the code or part of the code into the search box, click on the binoculars icon to search for it, and then select it from the resulting list by double clicking on it or by clicking on it once and pressing the return key |
| Consignee | The consignee (the receiver) Enter either the name, Short Code or EORI/ TIN number of the consignee. Select this information from a list by either typing a ? into this box, or by clicking on the ellipsis (the 3 dots) to the right of this box to display the Account Lookup Dialog box. Next, enter the code or part of the code into the search box, click on the binoculars icon to search for it, and then select it from the resulting list by double clicking on it or by clicking on it once and pressing the return key |
| Country of Dispatch/ Export | The UN/LOCODE of the country from which the goods were dispatched Select this information from a list by either typing a ? into this box, or by clicking on the ellipsis (the 3 dots) to the right of this box to display the Dispatch Country Lookup Dialog box. Next, enter the code or part of the code into the search box, click on the binoculars icon to search for it, and then select it from the resulting list by double clicking on it or by clicking on it once and pressing the return key |
| Transport Mode | The mode of transport of the goods. Click in the box and a list of transport modes will appear. Select the appropriate one by clicking on it |
| Transport Nationality | The UN/LOCODE of the country of the mode of transport Select this information from a list by either typing a ? into this box, or by clicking on the ellipsis (the 3 dots) to the right of this box to display the Transport Nationality Lookup Dialog box. Next, enter the code or part of the code into the search box, click on the binoculars icon to search for it, and then select it from the resulting list by double clicking on it or by clicking on it once and pressing the return key |
| Fallback | If NCTS is in Fallback, and you are authorised by HMRC for 'Business Continuity' procedures, make sure you have ticked the Fallback box before making a declaration |
| Country of Destination | The UN/LOCODE of the country of destination of the Movement Select this information from a list by either typing a ? into this box, or by clicking on the ellipsis (the 3 dots) to the right of this box to display the Destination Country Lookup Dialog box. Next, enter the code or part of the code into the search box, click on the binoculars icon to search for it, and then select it from the resulting list by double clicking on it or by clicking on it once and pressing the return key |
| Transport ID | Type in either the flight number, the registration number of the vehicle, or the vessel name/ voyage number |
| Into Transit Date | The date that the MRN was allocated and the goods were entered into transit (i.e. they were accepted by the customs system and allowed to move) will be automatically entered into this box. This information will come directly from customs |
| Write Off Date | The date that the goods that were released from transit will be automatically entered into this box. This information will come from customs |
| Total Guarantee Reference Amount | The total amount covered by the guarantee will be automatically entered into this box |
| Available Guarantee Reference Amount | The amount of the guarantee not allocated to any Movement will be automatically entered into this box |
| Potential Guarantee Amount | The amount of any customs revenue guaranteed as a result of this Movement will be automatically entered into this box |
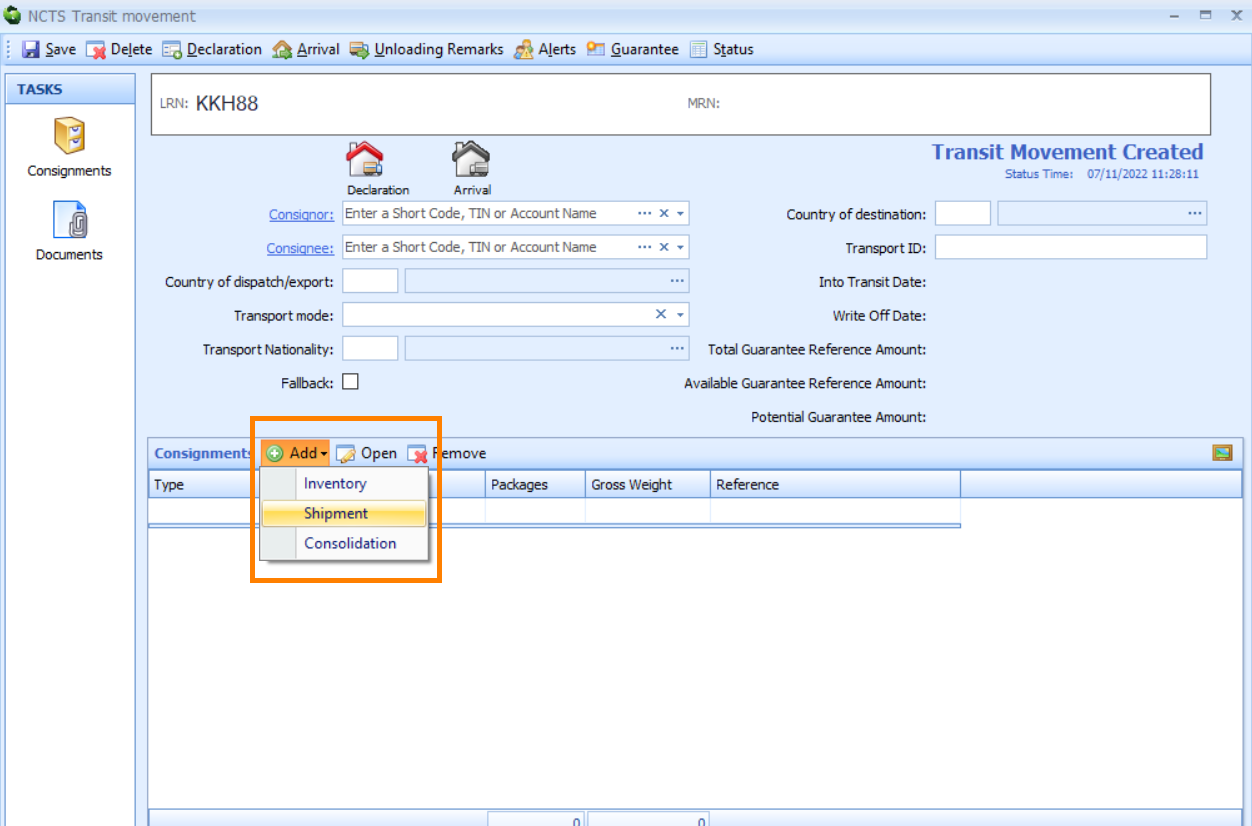
You can add an inventory record, shipment record and consolidation record to this Movement by clicking on the Add button, and selecting the type of record you wish to add from the resulting drop-down list.
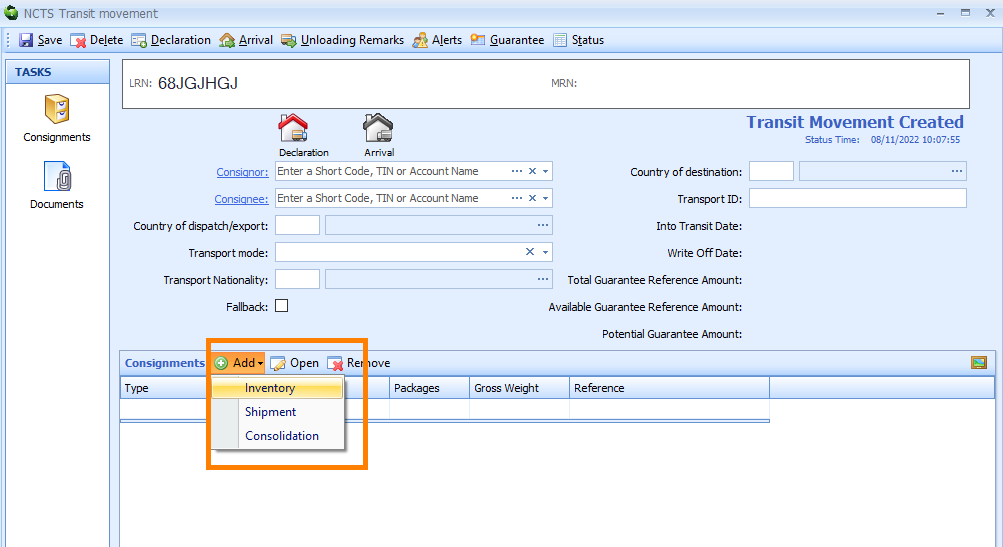
Depending on what you have selected from the drop-down list, either an Add Inventory to NCTS Movement, Add Shipments to NCTS Movement or Add Consolidated Shipments to NCTS Movement dialog box will appear.
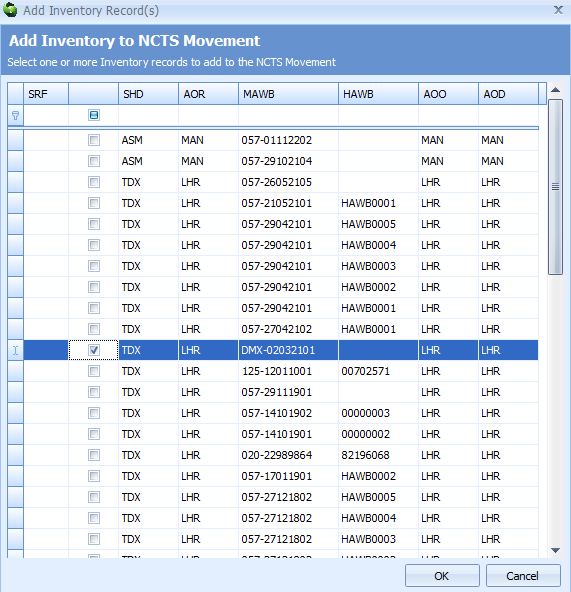
In the image below, you will see the Add Inventory to NCTS Movement dialog box. Select the record that you wish to add to the NCTS Movement by clicking in the small box next to it to add a tick, and then clicking on the OK button.
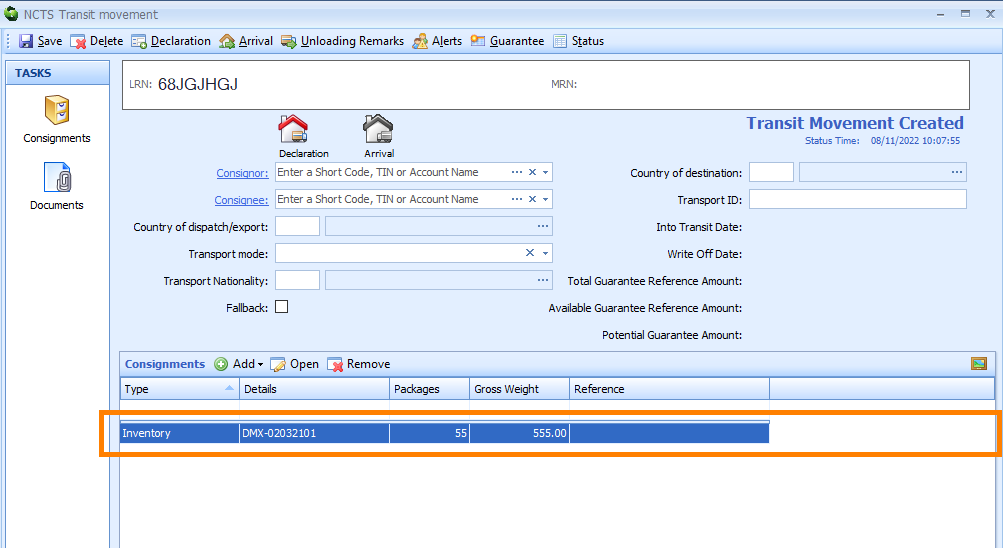
The inventory record has now been added to the NCTS Transit Movement editor.
When you have finished entering your information into the NCTS Transit Movement editor, click on the Save button at the top left hand corner of the NCTS Transit Movement editor.
Link Consignments to the movement
When a Movement has been created in order to prepare a transit declaration, Sequoia allows you to associate export shipments or consolidations and import inventory records with the Movement.
Exports shipments and consolidations will need to be in a 'Finalised' state (i.e. all DUCRs associated to a MUCR and the MUCR closed).
Import inventory records will need to have a transshipment request completed with 'OK Transfer ..', (customs status CT).
When a transit Movement has been created in order to submit a transit declaration, then linking the Movement to associated export shipments/consolidations or inventory removals will save a lot of time when creating the declaration.
Associated records will result in declaration items being created automatically - one for each item of every export declaration associated with the consignment. For example, when a shipment has been associated with the transit Movement, and this shipment has 2 Jobs, and each Job has a declaration with 10 items, then a total of 20 items will be added to the NCTS declaration.
Information, such as export declaration MRNs, commodity codes, goods descriptions, gross mass, net mass, and packages and marks will be automatically entered for you. A declaration requires a guarantee reference amount to also be declared, and this will also be automatically calculated and declared, based on the value, commodity codes etc. of the export declaration(s).
To link a consignment to the NCTS Movement, click on the Add button on the NCTS Transit Movement editor. A drop-down list will appear. Click on either import Inventory, export Shipment or export Consolidation, depending on the type of consignment that you want to link to the Movement record.
An Add to NCTS Movement Lookup Dialog box will appear, listing records available to link to the NCTS Movement.
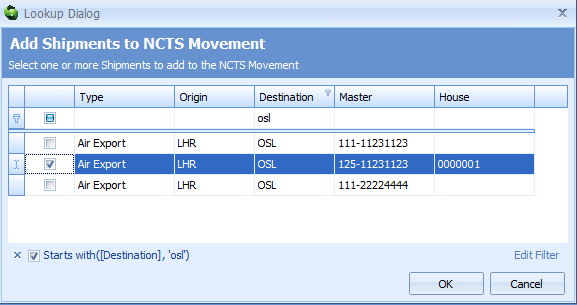
This list works like any other list in Sequoia; you can filter, sort and order it to find the record(s) that you require.
To select a record, click in the small box in first column next to it to add a tick. You can select as many records as you like this way. You can also mix shipments and consolidations on the same NCTS Movement. Once you have selected all the necessary records, click on the OK button. This will return you to the NCTS Transit Movement editor, and the records will appear in the list of consignments.
Remember to click on the Save button on the toolbar at the top of the editor to save all changes.