
Create an ETSF Pre-Arrival
How to create an ETSF Pre-Arrival Consignment Record
Overview
An External Temporary Storage Facility (ETSF) is a place situated outside the appointed area of a port or airport where chargeable goods may be held until they are processed by customs or re-exported. If goods are being sent to an ETSF, a Pre-Arrival Consignment record can be created by an ETSF Operator or by a customs Agent. The instructions below describe how ETSF Operators can create ETSF Pre-Arrival Consignment records.
Creating an ETSF Pre-Arrival Consignment record means that a Declaration linked to this Inventory Consignment can be conveniently lodged with customs before it arrives at the ETSF.
How to Auto-Create ETSF Pre-Arrival Consignment Records
Most Air Import Consignments go to a frontier ITSF Shed on arrival. These are then moved to an ETSF by the airline or ground handler - a process called an Inter-Shed Removal (ISR). When this happens an electronic notification called a 'CUKFSA P5 message' is sent to Sequoia by CCS-UK to notify the ETSF operator that the removal request has been made - a process sometimes referred to as a 'BI'.
You can set up Sequoia to automatically create an ETSF Pre-Arrival Consignment record when this notification is received which will save you the job of creating one manually. The only action you would need to perform manually would be to 'arrive' the ETSF Pre-Arrival Consignment when you physically receive the goods, a process described here.
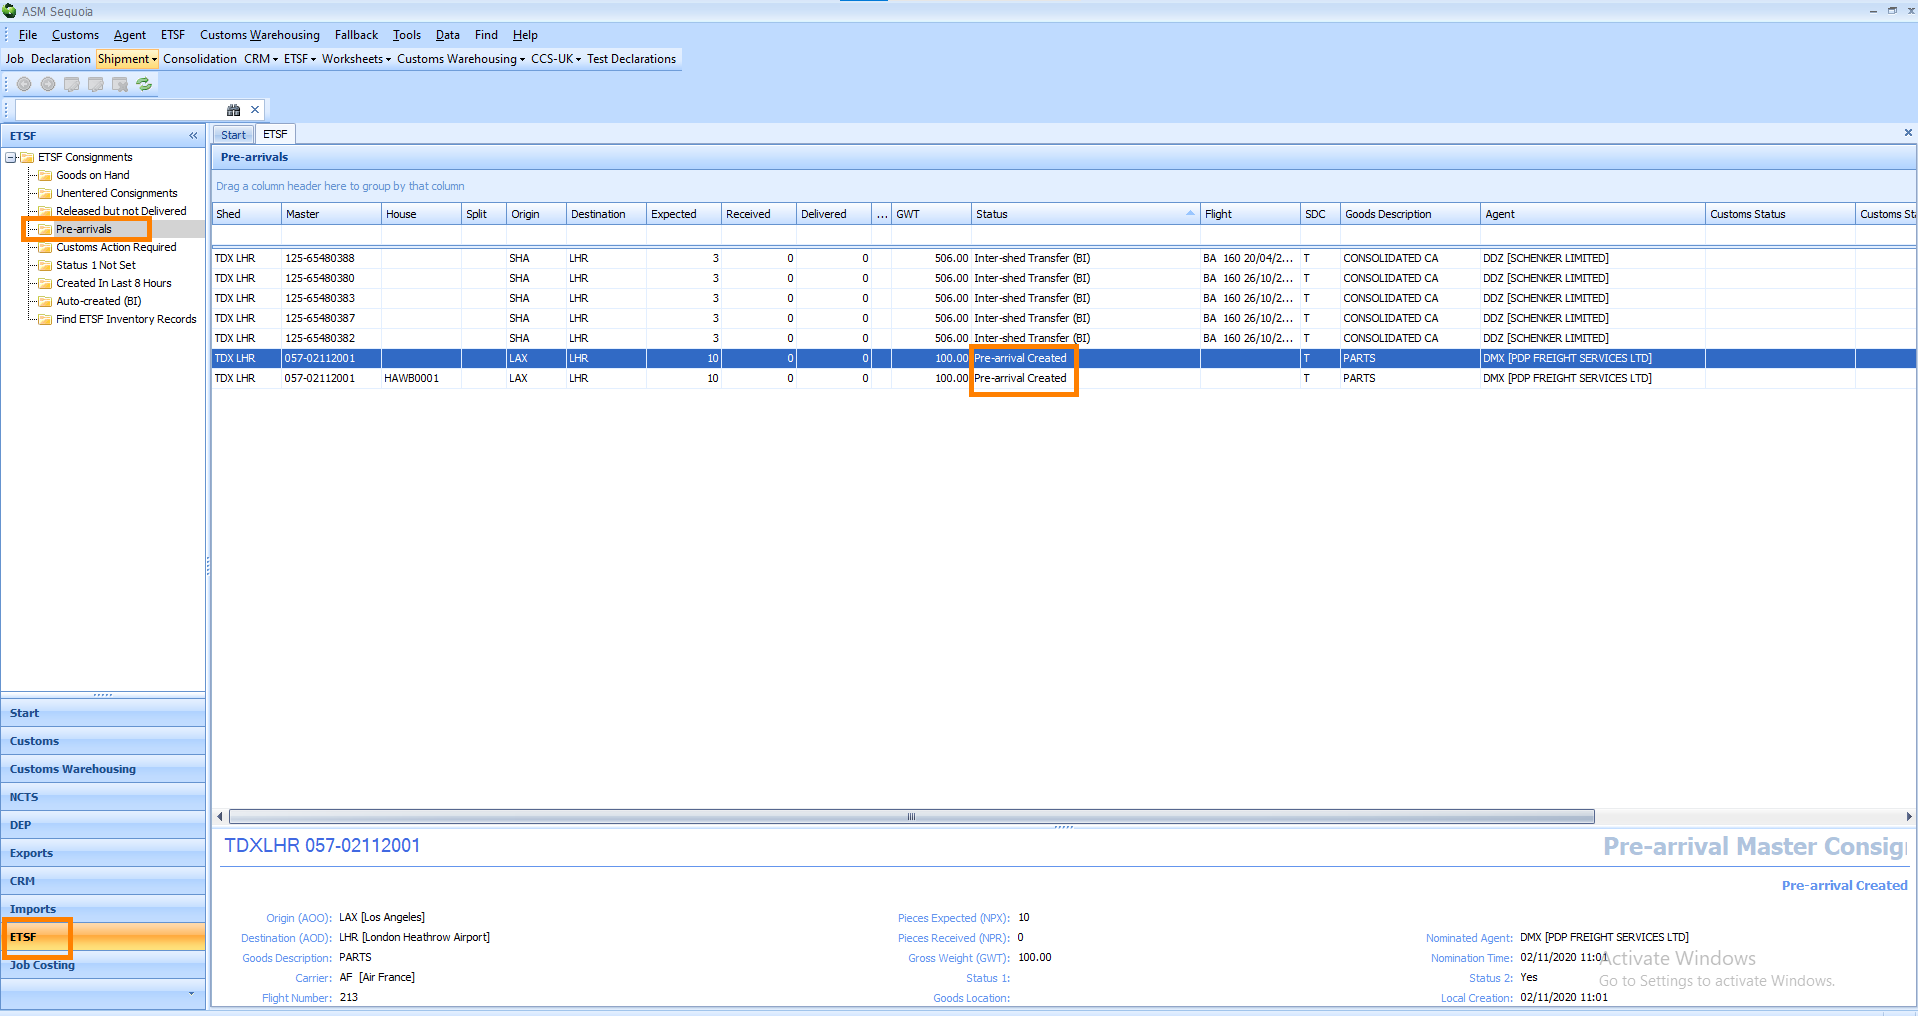
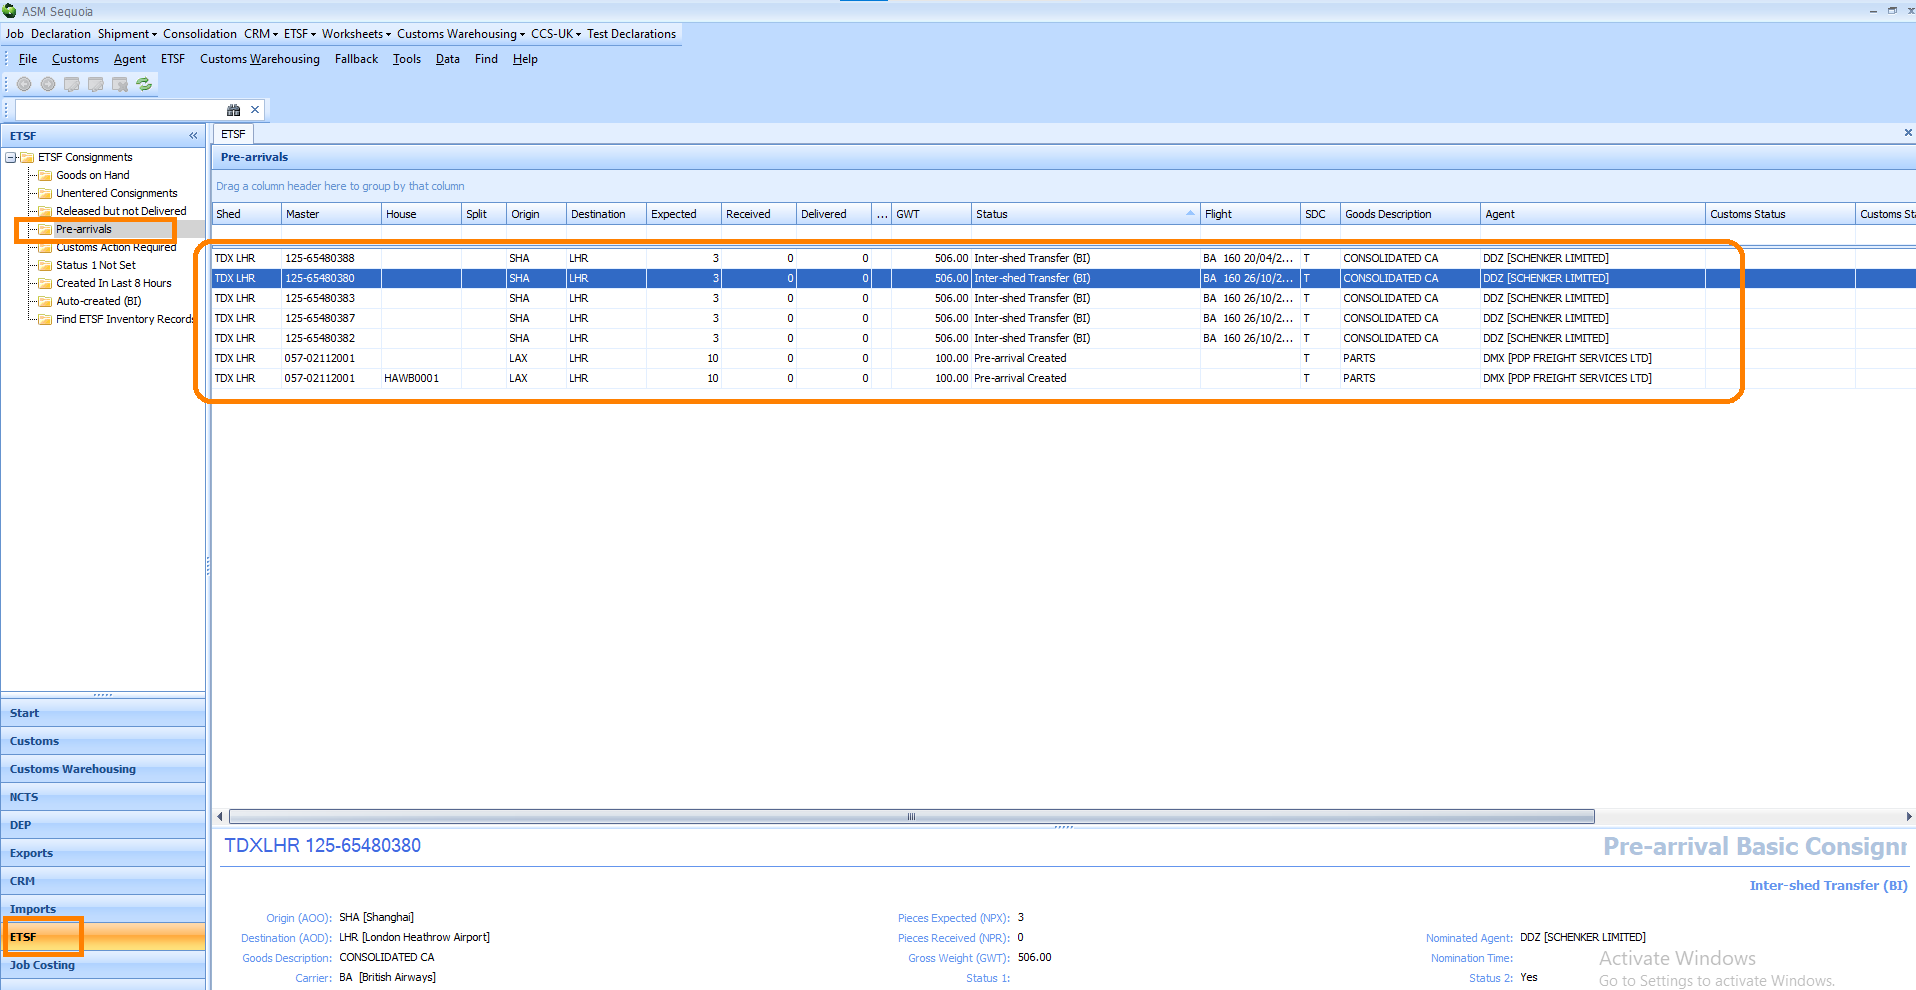
You can locate an automatically created ETSF Pre-Arrival Consignment record by clicking on the ETSF module at the bottom left hand side of the screen. Next, click on the Auto-created (BI) folder near the top left hand side of the screen. All of your automatically created ETSF Consignment records will appear in the List Panel to the right of the ETSF Consignments folders.
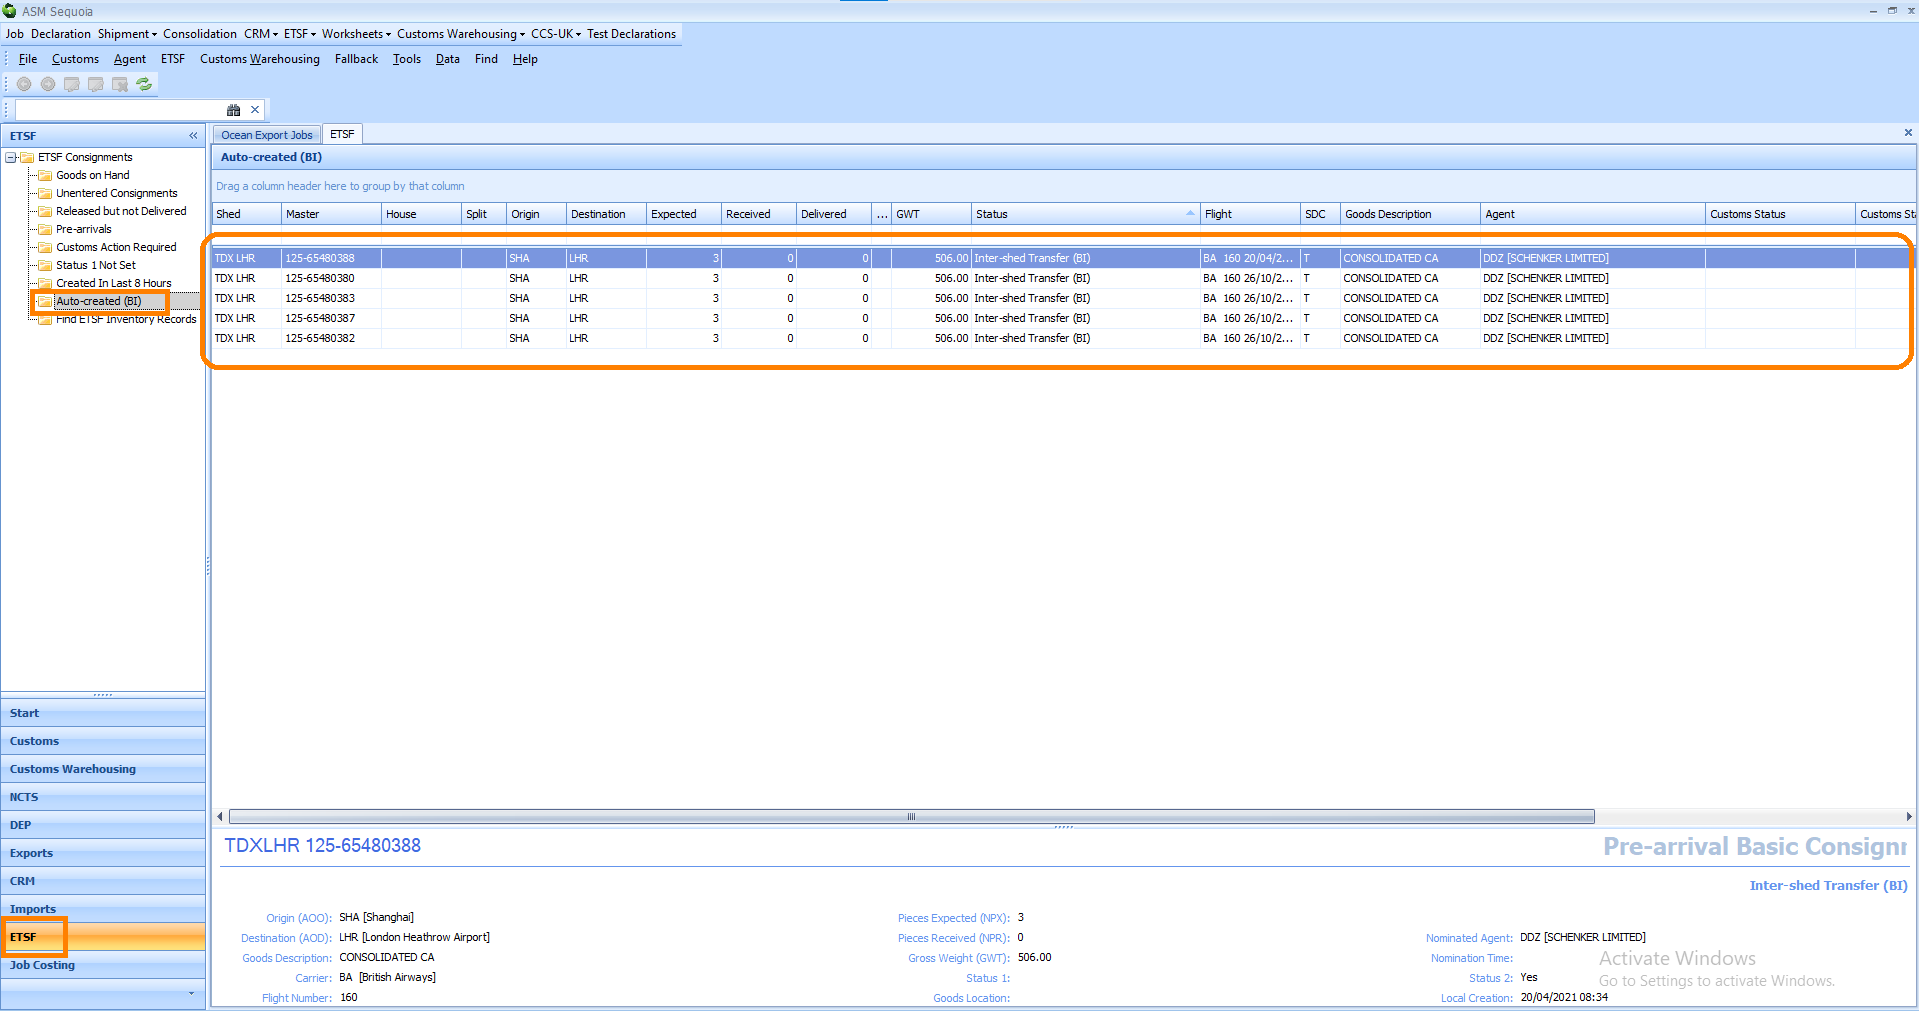
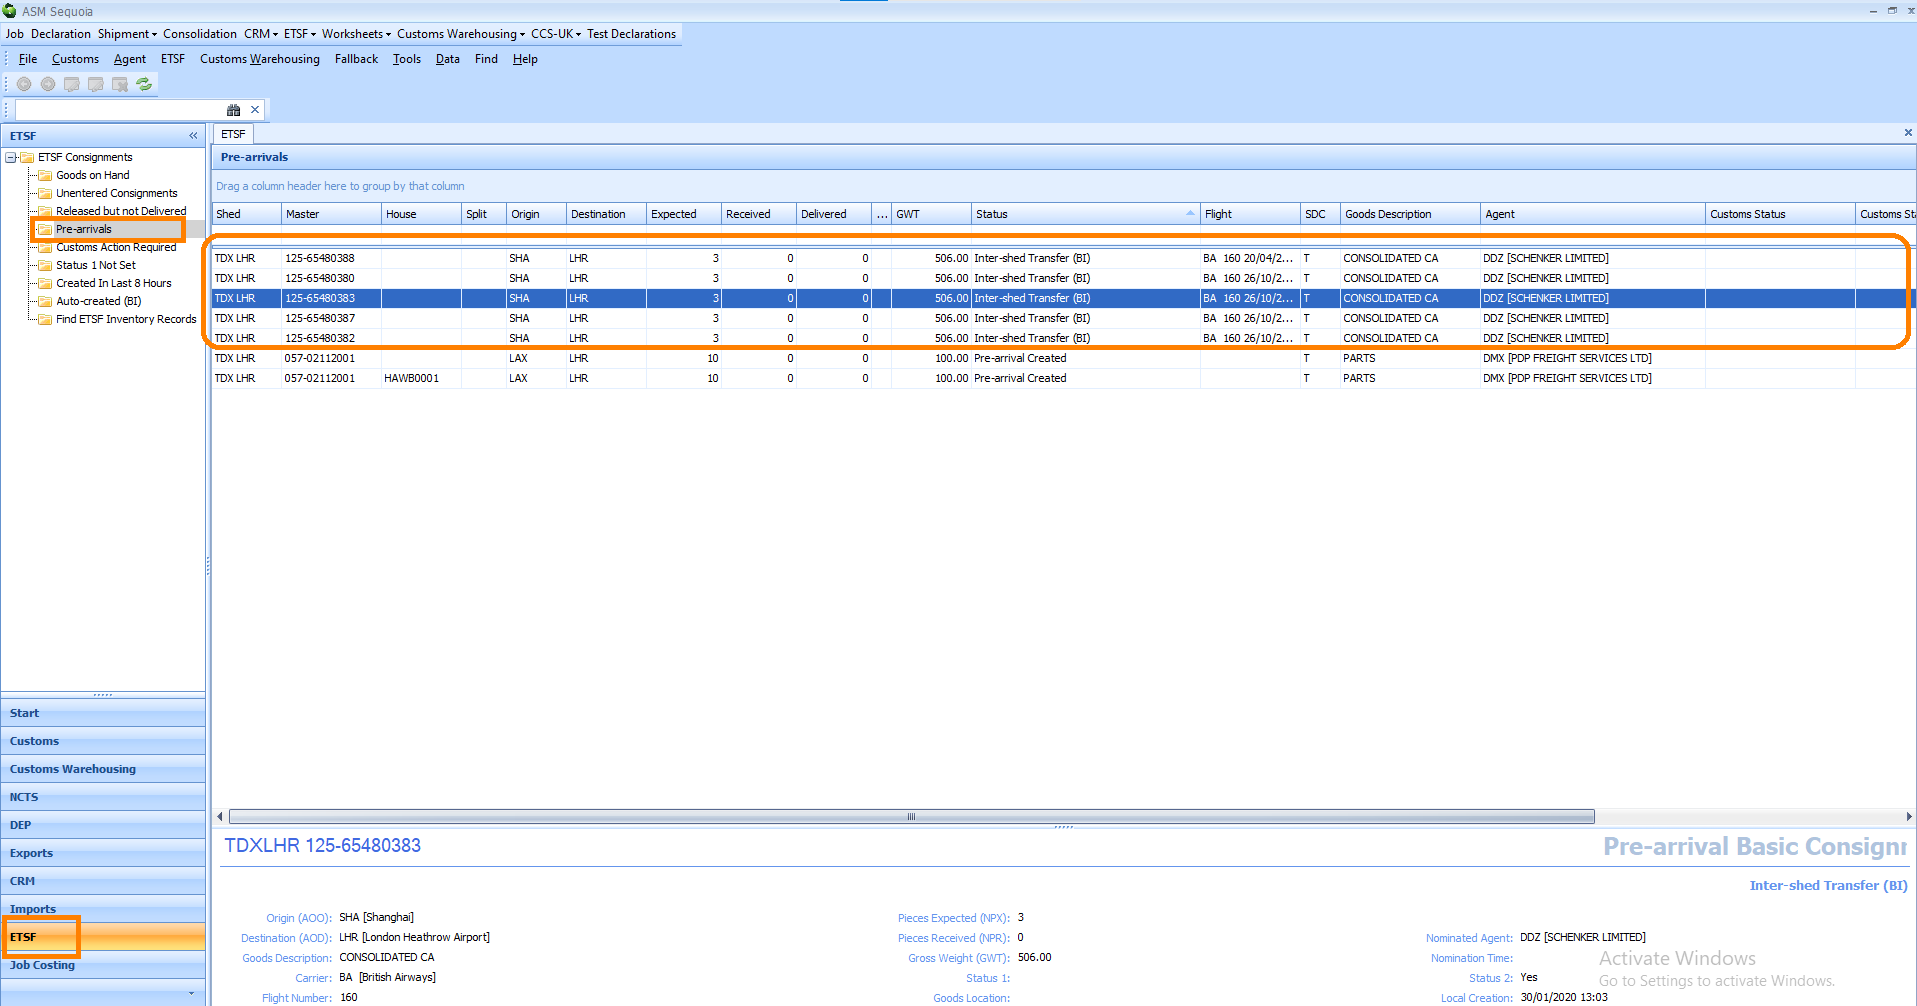
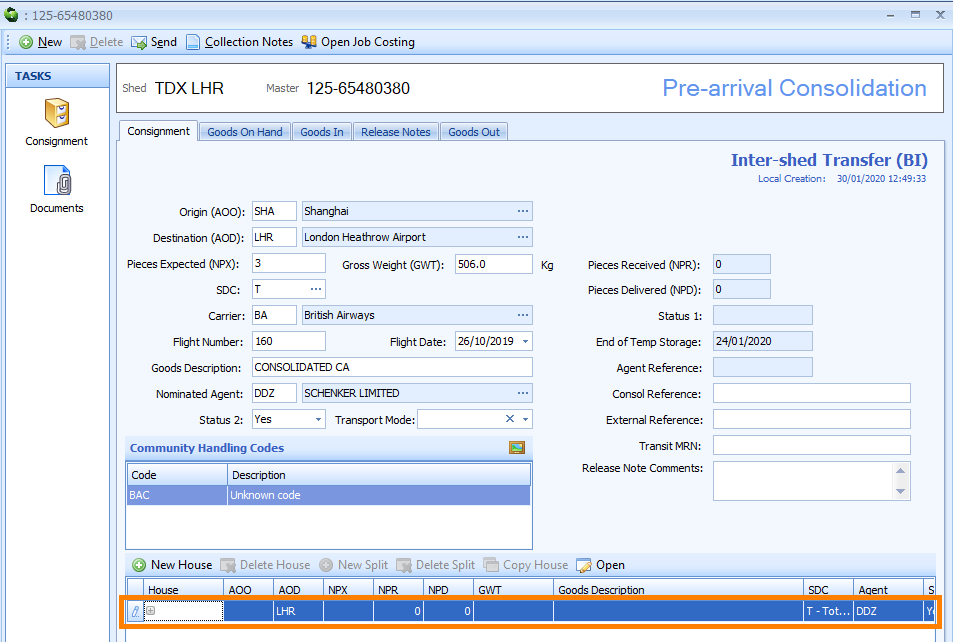
You can also locate automatically created ETSF Pre-Arrival Consignment records by clicking on the ETSF module at the bottom left hand side of the screen and then clicking on the Pre-Arrivals folder at the top left hand side of the screen. All of your ETSF Pre-Arrival Consignment records will appear in the List Panel to the right of the ETSF Consignment folders. The automatically created ETSF Consignment records will have 'Inter-shed Transfer (BI)' listed in the Status column.
Manually Create an ETSF Pre-Arrival Consignment Record
There are two ways to start creating an ETSF Pre-Arrival Consignment Record:
Either
1) Select File from the main Sequoia toolbar at the top left hand side of the screen. A context menu will appear. Click on New followed by ETSF, followed by ETSF Pre-Arrival in the context menu.

or
2) Click on the ETSF module at the bottom left hand side of the screen. Next, right click on the List Panel area of the screen and a context menu will appear. Click on New followed by ETSF Pre-Arrival in the context menu.
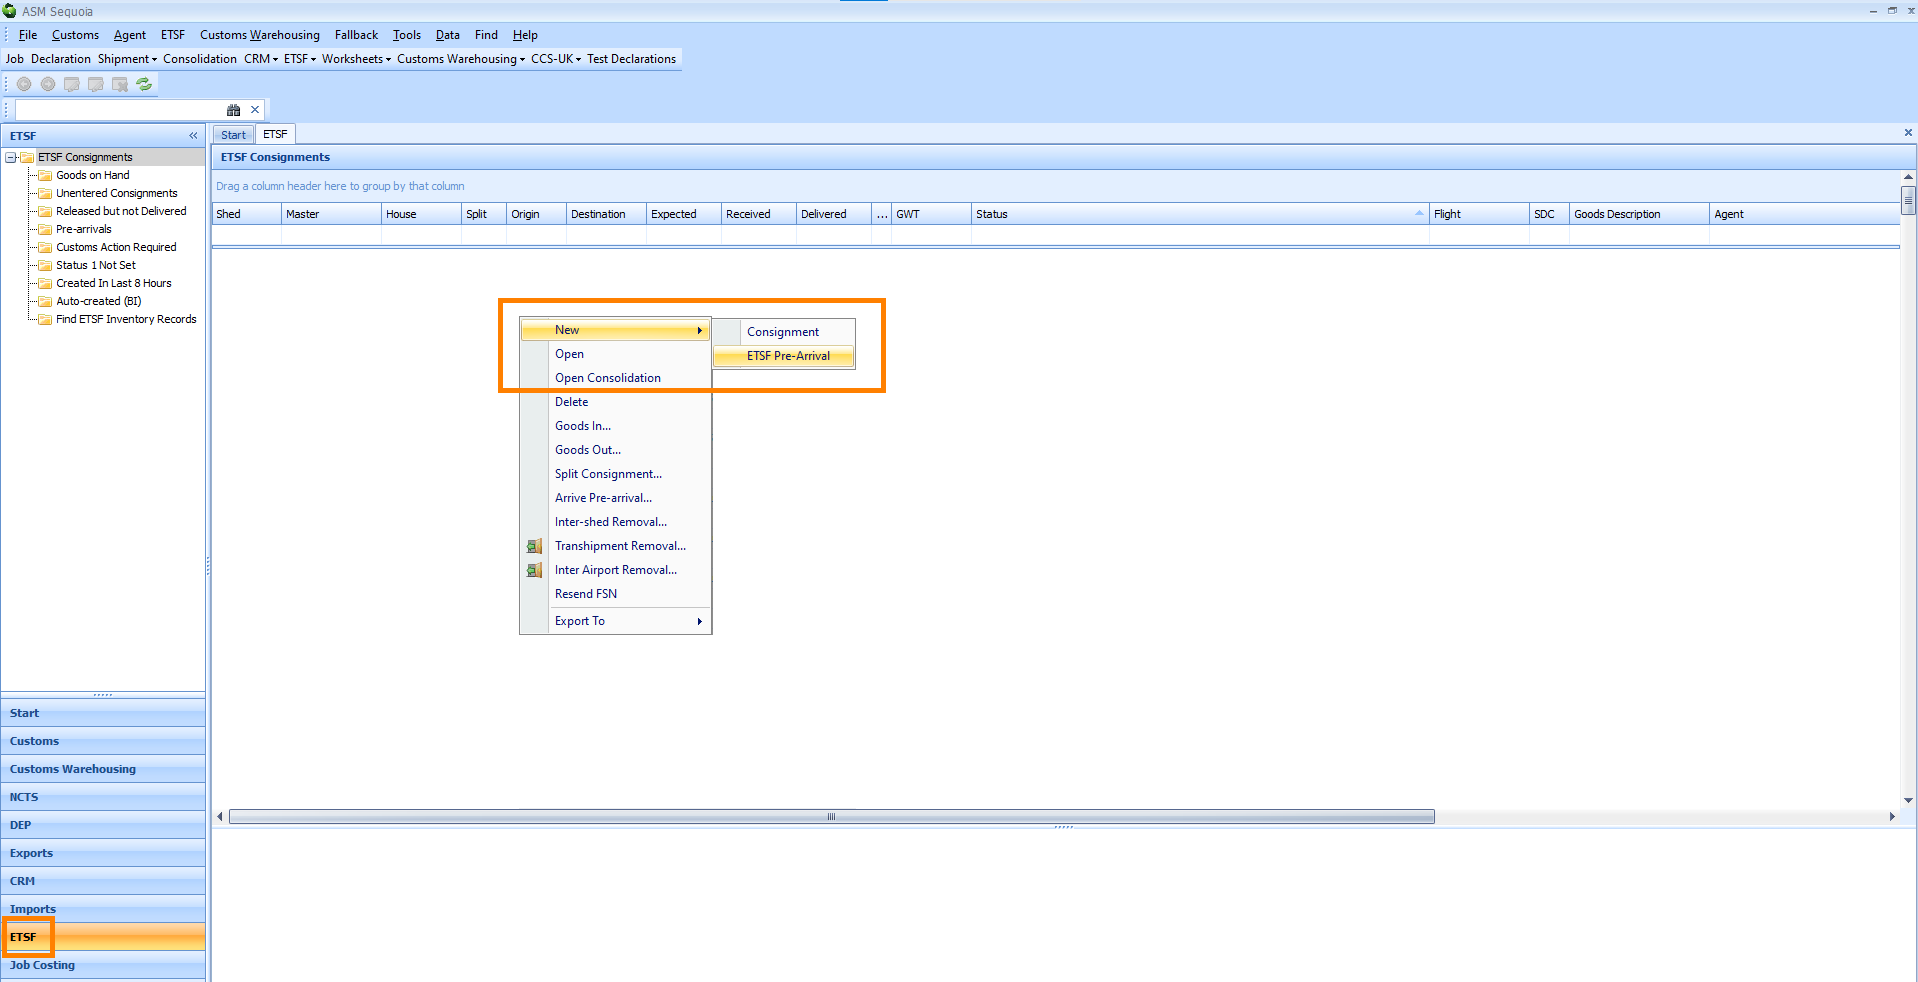
An ETSF Pre-Arrival Basic editor will appear.
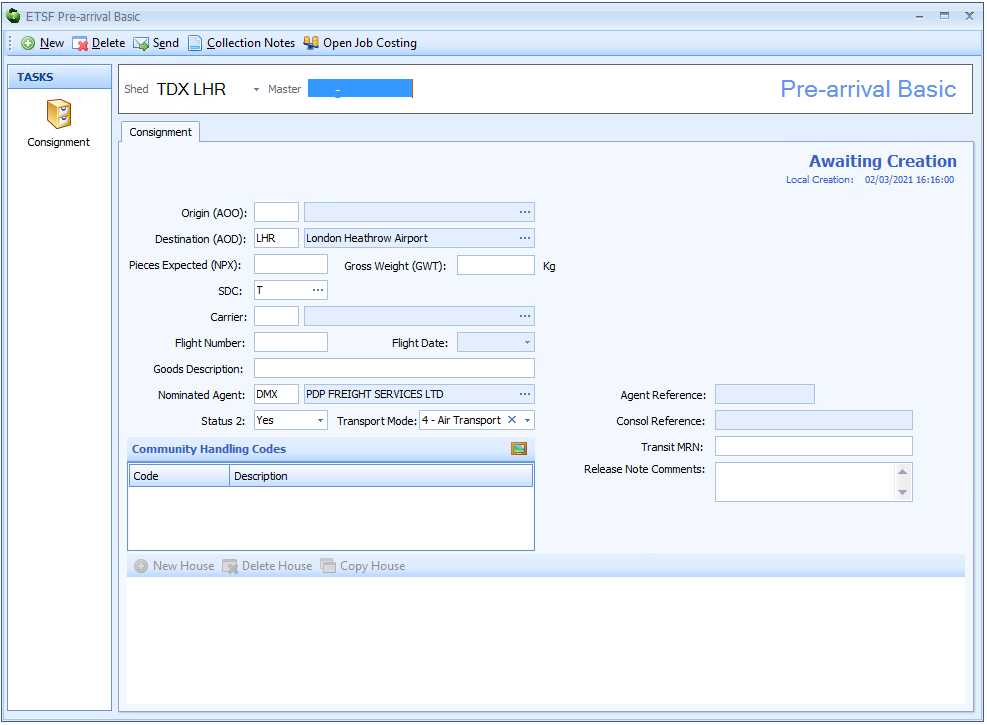
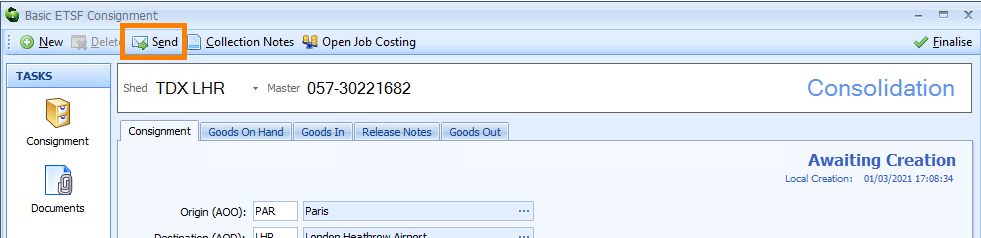
PLEASE NOTE: You cannot make changes to a Pre-Arrival Consignment record once you send it to CCS-UK by clicking on the Send button. If you need to make changes then you will need to delete it and create it again
Enter Master/ Basic Air Waybill Information
PLEASE NOTE: You must enter the information that is declared on the Basic/ Master Air Waybill into the Basic ETSF Consignment editor BEFORE you can enter any House Air Waybill information.
Type the Basic/ Master Air Waybill information described in the table below into the boxes of the ETSF Pre-Arrival Basic editor:
PLEASE NOTE: You must familiarise yourself with the requirements of Customs Notice 216: customs procedures at CCS-UK locations before creating and updating ETSF Inventory Consignments
| Box | Information |
|---|---|
| Shed | The Shed Code followed by the Airport Code You can click on the |
| Master | The Master Air Waybill prefix and number, for example 125-12345670 |
| Origin (AOO) | The 3 character IATA Airport Code of the origin airport shown on the Air Waybill You can search for this code by typing a ? into this box or by clicking on the ellipsis (the 3 dots) to the right of this box which will display the Origin Lookup Dialog box. Next, click on the binoculars icon to bring up a list of codes and select the correct code by double clicking on it |
| Destination (AOD) | The 3 character IATA Airport Code of the destination airport shown on the Air Waybill Sequoia will automatically enter the IATA Airport Code of your ETSF but this can be changed manually if it is different. You can search for this code by typing a ? into this box or by clicking on the ellipsis (the 3 dots) to the right of this box which will display the Destination Lookup Dialog box. Next, click on the binoculars icon to display a list of codes and select the correct code by double clicking on it |
| Pieces Expected (NPX) | The number of packages declared on the Master Air Waybill |
| Gross Weight (GWT) | The gross weight declared on the Master Air Waybill |
| SDC | The SDC (Shipment Description Code) You should refer to Customs Notice 216 to gain an understanding of these codes. You can search for this code by typing a ? into this box or by clicking on the ellipsis (the 3 dots) to the right of this box which will display the Shipment Description (SDC) Lookup Dialog box. Next, click on the binoculars icon to bring up a list of codes and select the correct code by double clicking on it |
| Carrier | The Carrier Code You can search for this code by typing a ? into this box or by clicking on the ellipsis (the 3 dots) to the right of this box which will display the Carrier Lookup Dialog box. Next, click on the binoculars icon to bring up a list of codes and select the correct code by double clicking on it |
| Flight Number | The number of the flight (not including the Carrier code) on which the goods are due to arrive |
| Flight Date | The date on which the flight is due to arrive. As this is a Pre-Arrival Consignment you cannot enter any information into this box. An empty box allows CCS-UK to identify a Consignment record as a Pre-Arrival |
| Goods Description | The description of the goods. This is limited to a maximum of 15 characters |
| Nominated Agent | The badge code of the Agent nominated to clear the goods You can search for this code by typing a ? into this box or by clicking on the ellipsis (the 3 dots) to the right of this box which will display the Agent Lookup Dialog box. Next, click on the binoculars icon to bring up a list of codes and select the correct code by double clicking on it |
| Status 2 | The Status 2 code indicates that you are happy for the Consignment to be released once the goods are cleared by customs Click on the |
| Transport Mode | The Transport Mode Code This code will not be transmitted as part of the Consignment information. Click on the |
| Agent Reference | You are not able to enter anything into this box. Once a customs Declaration has been made against this Inventory Consignment then the last 8 characters of the Agent Reference (as was inputted into box 7 of the customs Declaration) will be automatically added to this box |
| Consol Reference | You can enter your own Consolidation Reference if you would like to Please note that you cannot enter a Consolidation Reference here until you have entered House Air Waybill information |
| External Reference | You can enter your own External Reference if you would like to Please note that if you enter your own External Reference here and this Inventory record is linked to a Job in Sequoia then the same External Reference will be automatically added to that Job. You can enter your own External Reference if you would like to. If you do enter an External Reference here and this record is linked to a Job in Sequoia then it will be automatically added as an External Reference to the Job |
| Transit MRN | The Transit MRN number If the creation of this Inventory record is as a result of discharging a transit movement into temporary storage then you can enter the Transit MRN number here. It will not be transmitted as part of the Consignment information but is available as part of the Find ETSF Inventory Records as a search option |
| Release Note Comments | You can enter any general notes you may have about the Consignment here Any text entered into this box will be printed on the release notes generated for this Consignment |
| Community Handling Codes | Any Community Handling Codes that were added to the airline record will be displayed here automatically |
If this Pre-Arrival Consignment only has Basic/ Master Air Waybills (i.e. there is no manifest with House Air Waybills attached) click on Send on the toolbar at the top left hand side of the Basic ETSF Consignment editor. This will close the editor and send the Pre-Arrival Consignment record will be sent to CCS-UK.
You can locate this Pre-Arrival Consignment record in Sequoia by clicking on the ETSF module at the bottom left hand side of the screen. Next, click on the Pre-Arrivals folder at the top left hand side of the screen. All of your ETSF Pre-Arrival Consignment records will appear in the List Panel to the right of the ETSF Consignments folders showing as 'Pre-arrived' in the Status column.
If, however, this Pre-Arrival Consignment also has House Air Waybills then follow the instructions below.
Enter House Air Waybill Information
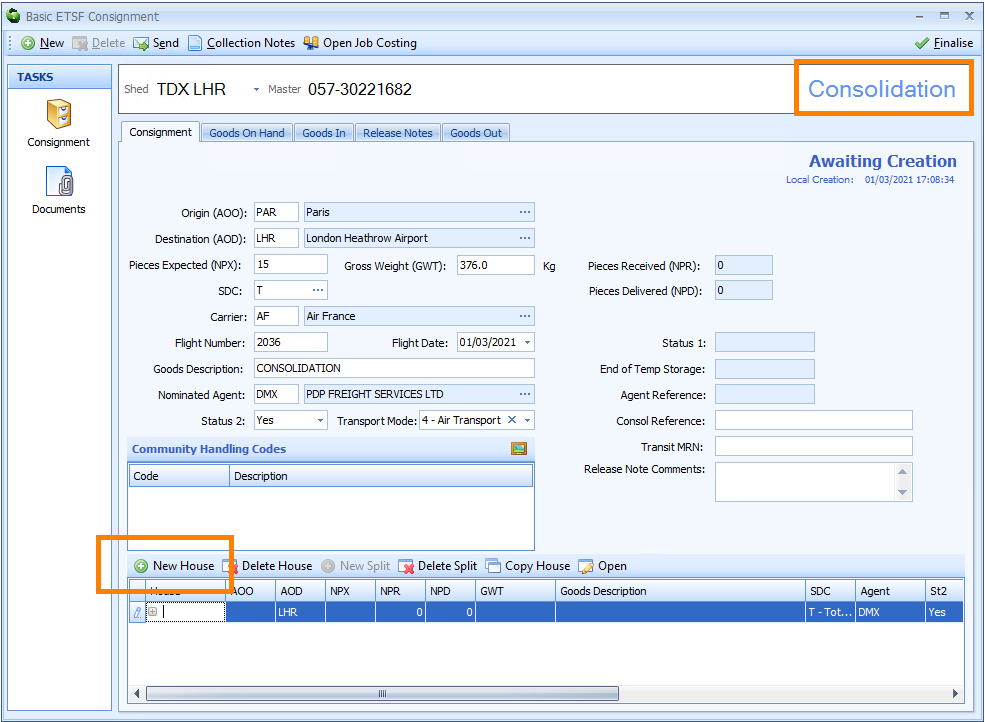
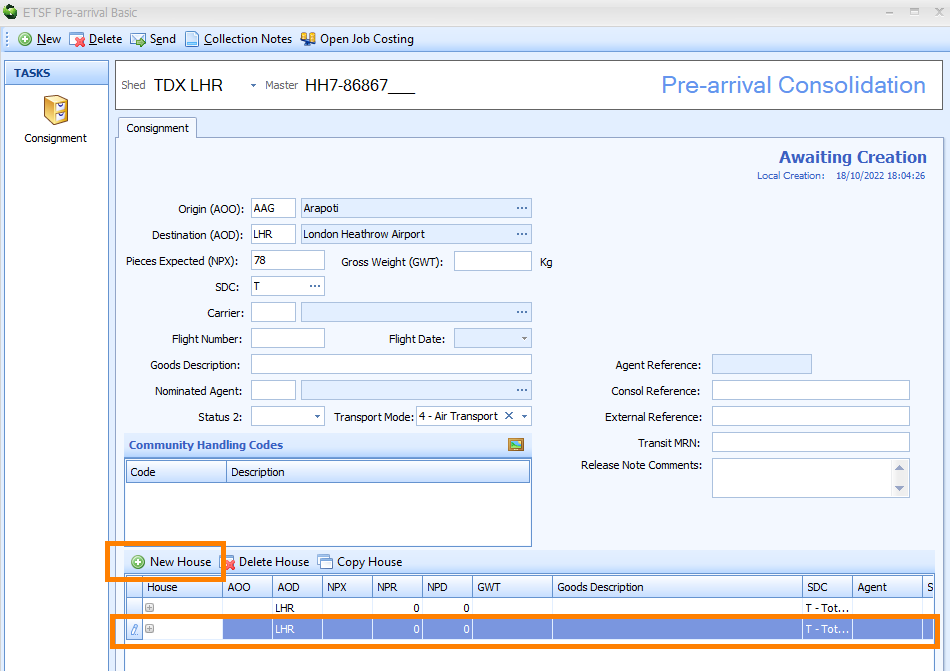
PLEASE NOTE: You must first enter any Basic/ Master Air Waybill information into the Basic ETSF Consignment editor before you can enter any House Air Waybill information. See the 'Enter Master/ Basic Airway Information' section above for instructions on how to do this. Adding a House Consignment record to the Basic ETSF Consignment editor turns this record into a Consolidation record (i.e. a consolidation of Consignments). You will see that the description in the top right hand corner of the editor has changed from 'Pre-Arrival Basic' to 'Consolidation'.
Click on New House at the bottom of the Basic ETSF Consignment editor.
Enter the information described in the table below into the row that represents the House Consignment record in the Basic ETSF Consignment editor. You can type in the information by clicking in each corresponding column in the row.
| Column | Information |
|---|---|
| House | The House Air Waybill number (HAWB) This must be 8 characters only (upper case letters and numbers). If the House Air Waybill number has less that 8 characters then add zeros to the beginning of it to make it 8 characters. If it has more that 8 characters then only enter the last 8 characters |
| AOO | The 3 character IATA Airport Code of the origin airport shown on the House Air Waybill You can search for this code by typing a ? into this box which will display the Airport of Origin Dialog box. Next, click on the binoculars icon to bring up a list of codes and select the correct code by double clicking on it |
| AOD | The 3 character IATA Airport Code of the destination airport shown on the House Air Waybill Sequoia will automatically enter the IATA Airport Code of your ETSF but this can be changed manually if it is different. You can search for this code by typing a ? into this box which will display the Airport of Destination Dialog box. Next, click on the binoculars icon to bring up a list of codes and select the correct code by double clicking on it |
| NPX | The number of packages declared on the House Air Waybill |
| NPR | The number of packages physically received You are not able to enter anything into this box. This box will automatically update when you record 'goods in' for this Consignment in the Goods in section of the Basic ETSF Consignment editor |
| NPD | The number of packages delivered You are not able to enter anything into this box. This box will automatically update when you record 'goods out' for this Consignment in the Goods out section of the Basic ETSF Consignment editor |
| GWT | The gross weight declared on the House Air Waybill |
| Goods Description | The description of the goods. This is limited to a maximum of 15 characters |
| SDC | The SDC (Shipment Description Code) You should refer to Customs Notice 216 to gain an understanding of these codes. Please note that if the SDC code of the Master is declared as M then at least one of the House Consignments must also be declared as M. You can search for this code by typing a ? into this box which will display the Shipment Description (SDC) Lookup Dialog box. Next, click on the binoculars icon to bring up a list of codes and select the correct code by double clicking on it |
| Agent | The badge code of the Agent nominated to clear the goods You can search for this code by typing a ? into this box which will display the Agent Lookup Dialog box. Next, click on the binoculars icon to bring up a list of codes and select the correct code by double clicking on it |
| St2 | The Status 2 code indicates that you are happy for the Consignment to be released once the goods are cleared by customs Click on the |
| Status Description | The status of the Consignment You are unable to enter anything into this box. Sequoia will automatically add 'Awaiting Creation' into this box. It will automatically change and update as the Consignment progresses |
| Release Note Comments | You can enter any general notes you may have about the Consignment here Any text entered into this box will be printed on the release notes generated for this Consignment |
| External Reference | You can enter your own External Reference if you would like to Please note that if you enter your own External Reference here and this Inventory record is linked to a Job in Sequoia, then the same External Reference will be automatically added to that Job |
| Status 1 | The Status 1 code indicates that the number of packages physically received equal the number expected You are not able to enter anything into this box. This box will automatically update with the date that you physically receive all your packages and record this in the Goods in section of the Basic ETSF Consignment editor |
| Customs Status | The status of this Consignment You cannot enter anything into this box. This box will automatically be updated once the Consignment information is sent to CCS-UK. When a Declaration or Removal is submitted against this Consignment record then the Customs Status will update automatically |
If you need to add another House record to this Pre-Arrival Consignment/ Consolidation record click on the on New House button again at the bottom of the Basic ETSF Consignment editor. You can also do this by clicking in the blank area below your other House records and pressing on the down arrow key on your keyboard. Another Pre-Arrival House Consignment record row will be added to the editor which you can complete. Each row represents one Pre-Arrival House Consignment record.
When you have finished adding all your Pre-Arrival House Consignment records to this Consolidation record click on the Send button on the toolbar in the top left hand side of the Basic ETSF Consignment editor. This will close the editor and send the Pre-Arrival Consignment/ Consolidation record to CCS-UK.
You can locate this Pre-Arrival Consignment/ Consolidation record in Sequoia by clicking on the ETSF module at the bottom left hand side of the screen. Next, click on the Pre-Arrivals folder at the top left hand side of the screen. All of your ETSF Pre-Arrival Consignment/ Consolidation records will appear in the List Panel to the right of the ETSF Consignments folders with 'Pre-Arrival Created' showing in the Status column.
How to 'Arrive' a Pre-arrival Consignment
If you set a Pre-Arrival Consignment to 'arrive' it means that, according to your Master or House documentation, it should have arrived at the ETSF.
To 'arrive' a Pre-Arrival Consignment click on the ETSF module at the bottom left hand side of the screen. Next, click on the Pre-Arrivals folder at the top left hand side of the screen. A list of your Pre-Arrival Consignments will appear in the List Panel area to the right of the ETSF Consignments folders.
Right click on the Pre-Arrival Consignment record that you wish to set to 'arrive' and a context menu will appear. Click on Arrive Pre-Arrival in the context menu.
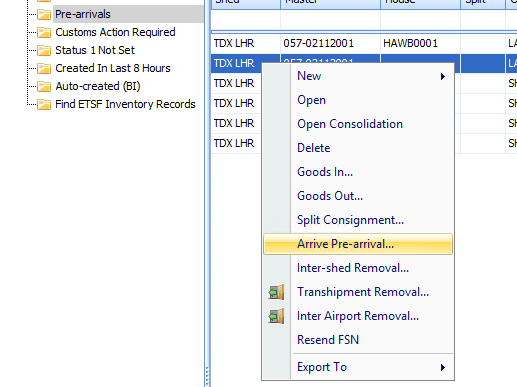
A dialog box will appear asking if you are sure you want to 'arrive' this Pre-Arrival. Clicking on the Yes button will set the Pre-Arrival Consignment record to 'arrive' and simultaneously send this update to the CCS-UK Inventory system. It may take a little while for CCS-UK to process this update but, once it has, the Pre-Arrival Consignment will be automatically removed from the Pre-arrival list in Sequoia. It will then appear in the ETSF Consignments list which you can access by clicking on the ETSF module at the bottom left hand side of the screen. Next, click on the ETSF Consignments folder at the top left hand side of the screen and it will appear in the List Panel to the right of the ETSF Consignments folders.
Any import customs Declaration linked to this Inventory Consignment will be automatically updated by HMRC and the Status column of this Inventory Consignment record will be updated accordingly.