Importing Worksheets
Overview
This guide covers importing (uploading) worksheet data into Sequoia. The functionality is the same regardless if the worksheet is for Import or Export declaration data.
Details of the supported structure of the worksheet data can be found here.
A guide to importing the worksheet data into a declaration can be found here.
Uploading a Worksheet into Sequoia
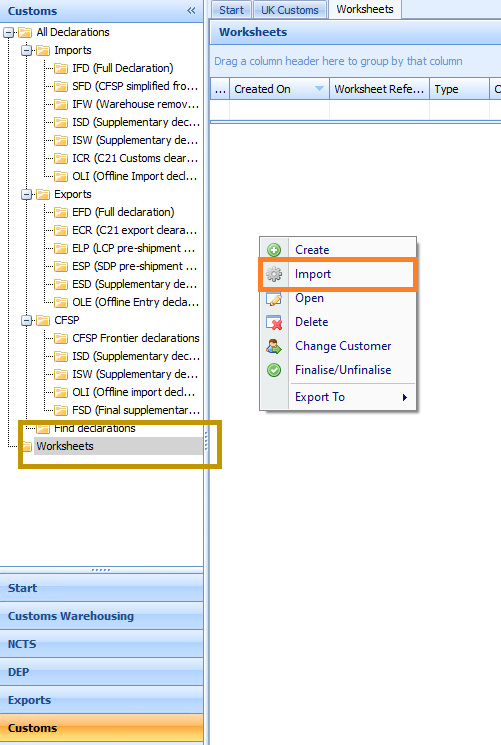
To upload a worksheet into Sequoia, right-click within the Worksheets list in the Customs module to display the context menu and select Import, as shown below.

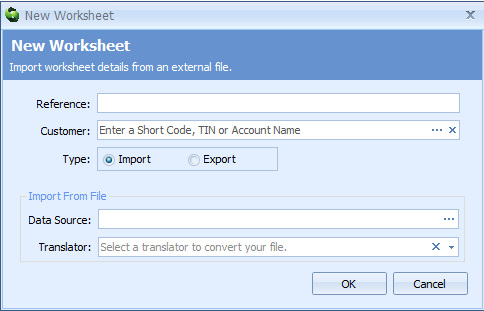
The New Worksheet dialog will be displayed (as shown below).
You can also create a worksheet manually if required. From the context menu above, click the Create option (rather than the Import option).
In those circumstances, the dialog below will be displayed without the Import From File section.

| Label | Description |
|---|---|
| Reference | Your reference number to identify the worksheet. |
| Customer | The worksheet customer. This must be an existing CRM Account. This control supports a lookup to CRM using the ellipsis button or by entering a question mark ('?'). |
| Type | Select whether the worksheet is for Import or Export declarations. |
| Data Source | This is the location of the worksheet file. Use the ellipsis button to display a Windows Explorer window to navigate to the file. |
| Translator | Select the type of worksheet translator to use to import the file: export/import Excel Biff - for importing older Excel .xls file types export/import Xlsx - for importing the newer style Excel .xlsx file types Worksheet Xml - for importing worksheets in XML format. The XML format must follow the same schema used when importing worksheets through the Sequoia API service |
Click the OK button when ready to import. The dialog will close and the data from the file will start to be imported into Sequoia. The Worksheet Editor will be displayed showing the busy animation until the data import is complete.
The Worksheet Editor
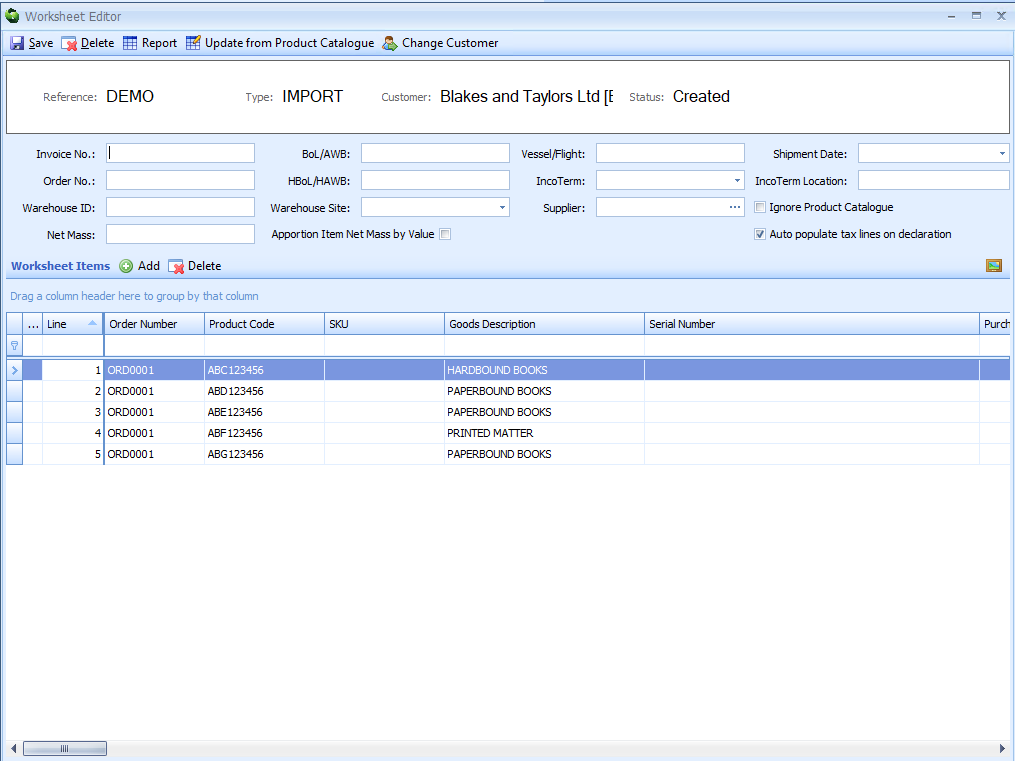
The editor is displayed after initially importing the data or when an existing worksheet is opened from the list.
An existing worksheet can be opened by double-clicking the record in the list or by clicking the Open context menu option.

The data displayed is mapped from the original worksheet file. The other settings are described below.
| Label | Description |
|---|---|
| Apportion Item Net Mass by Value | Requires a Net Mass value to be set on the worksheet header. Check this setting if you would like the item level Net Mass to be automatically calculated when importing the worksheet into a declaration. |
| Auto populate tax lines on declarations | Check this setting to have Sequoia use the tariff to determine which tax lines are required to be added to the declaration item based on the worksheet data. |
Additional worksheet items can be added by clicking the Add button on the toolbar above the list of items. A worksheet item can be deleted by selecting it and clicking the Delete button on the toolbar above the list of items.
Main Toolbar Buttons
The toolbar at the top of the worksheet editor has a number of buttons, as follows:
| Button | Description |
|---|---|
| Save | Save any changes made to the worksheet data. |
| Delete | Deletes the worksheet from Sequoia. This is not allowed once any of the worksheet items have been imported into a declaration. |
| Report | Produces a report for this worksheet. The report includes information from any declaration(s) linked to the worksheet. |
| Update from Product Catalog | Updates the worksheet item data using any Product Catalog records associated with the Customer CRM Account. |
| Change Customer | Use this if you need to change the CRM Account this worksheet is associated with. |
Validation
The worksheet goes through a validation process when being imported into Sequoia.
If any errors are found, the data will still be uploaded but the Status - displayed top right of the editor - will be Created with Errors. This status will prevent the worksheet from being imported into a declaration and therefore errors should be corrected as soon as possible.
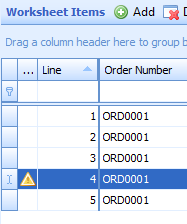
Any worksheet item which has an error will display a warning triangle, as shown below.

Selecting the row with the validation warning will display details of the errors in the bottom right hand corner of the editor.

Once all the errors have been resolved, click the Save button. The Status will change to Created and the worksheet will be available for importing into a declaration.
