Sequoia Configuration - CNS Gateway
Overview
The gateway handles the communication of messages between Sequoia and CNS.
Configuration involves adding the login details required to authenticate with CNS's system - these login details are provided by CNS at the time of acquiring your badge code(s).
Setting up the Gateway
To access the gateway, navigate through Sequoia Enterprise Management in the Sequoia Configuration application and expand the Sequoia Gateway Configuration node.
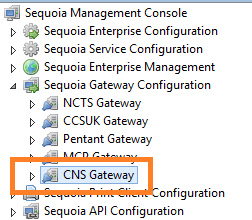
Click on CNS Gateway and the application settings configuration page will be shown in the right-hand pane.
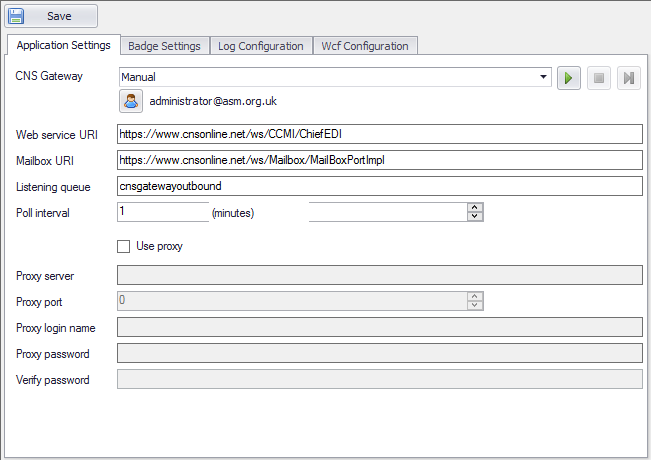
| Label | Description |
|---|---|
| CNS Gateway | These controls indicate how the Windows service is configured. This is normally setup at the time of installation but can be changed here. The service can be stopped/started using the 'stop'  and 'play' and 'play'  buttons. buttons.The user account can be changed by clicking on the user icon  |
| Web service URI | This is address of CNS's web service. This should not be changed unless under guidance from the ASM Helpdesk. |
| Mailbox URI | This is address of CNS's mailbox service. This is the address where report response messages are held. This should not be changed unless under guidance from the ASM Helpdesk. |
| Listening queue | This is the message queue that the gateway uses to send messages to CNS. This should not be changed unless under guidance from the ASM Heldpesk. |
| Poll interval | This governs how often, in minutes, the gateway will check for messages at CNS. The default setting is 1 minute; changing this would cause delays in receiving responses from CNS. |
| Use Proxy | If access to the CNS web service URI is required to go through a proxy server (you're own IT department will determine if this is the case) then enable this checkbox and complete the proxy server details below with the details obtained from your own IT department. |
Configuring the Badges to use the Gateway
Each badge you have for CNS must be configured to use the gateway. Refer to the this section for configuring badges.
Click the Badge Settings tab.
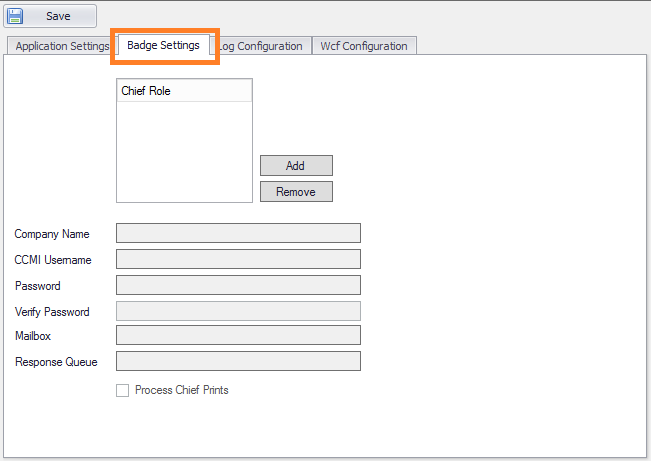
In order to assign a badge, click the Add button. This will display the Assign CHIEF Role dialog.
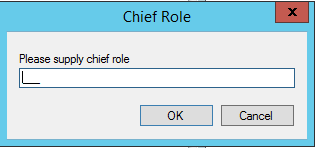
Enter the 3 letter badge code and click OK.
Once the badge has been added, the remainder of the configuration can be completed.
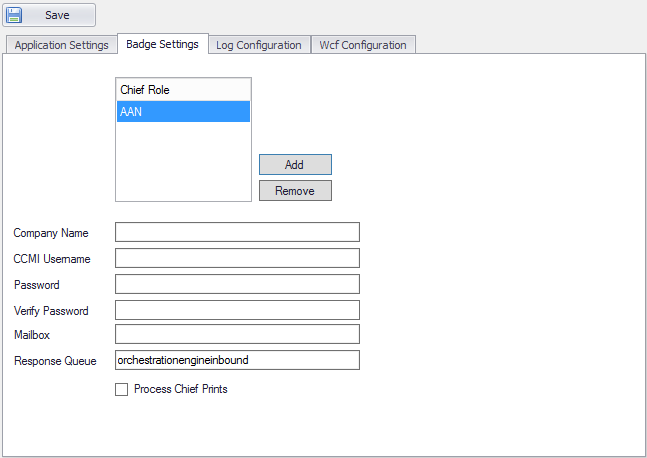
| Label | Description |
|---|---|
| Company Name | The name of the organisation operating the badge. |
| CCMI Username | Your login code assigned by CNS. |
| Password | Password assigned by CNS. This is case sensitive. |
| Verify Password | As above. |
| Mailbox | This code is assigned by CNS for receiving reports via EDI. |
| Response Queue | This is the message queue that the gateway uses to post the received messages from CNS. This should not be changed unless under guidance from the ASM Heldpesk. |
| Process CHIEF Prints | Enable this setting if you are configured to received reports via EDI. |
Click the Save button once all details are entered.
The Windows service ASM Sequoia CNS Gateway will need to be (re)started to use these settings.
